
Recovery Factor Calculation for Smart Traders
Master the recovery factor calculation to measure a strategy's resilience. Learn the formula, see DeFi examples, and find top wallets with Wallet Finder.ai.

June 20, 2026


Wallet Finder
March 29, 2026
If you're looking for Coinbase Wallet help, the first thing to grasp is that it's a self-custody app. This means you are in complete control of your crypto, which is a big deal and a totally separate concept from the main Coinbase exchange you might be used to.
Getting started is pretty straightforward: download the app or browser extension, create your new wallet, and—most importantly—securely back up your unique 12-word recovery phrase offline.
Jumping into the world of self-custody can feel like a leap, but setting up your Coinbase Wallet is more intuitive than you might think. This guide is all about giving you clear, actionable Coinbase Wallet help so you can start your Web3 journey on the right foot. We'll walk through the entire initial setup, from the download to making sure your assets are secure from day one.
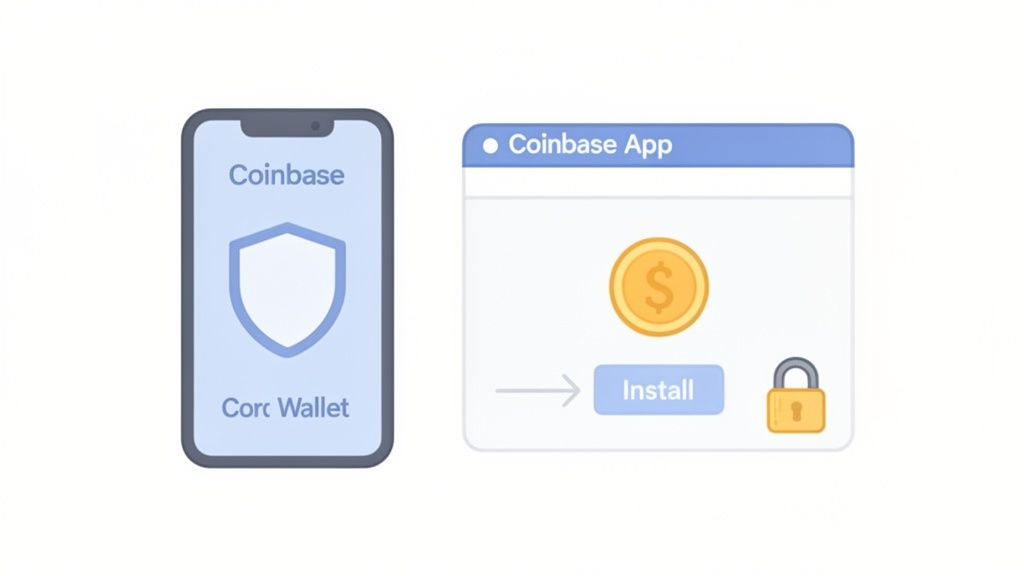
The biggest hurdle for newcomers is often telling the difference between the main Coinbase app and the Coinbase Wallet. They look similar but serve completely different roles.
Think of it this way:
To clear things up, here’s a quick breakdown of how they stack up against each other.
The table below breaks down the core differences, helping you choose the right tool for the job.
Understanding this distinction is crucial. The app is for trading and cashing out, while the wallet is your gateway to the decentralized internet.
First things first, you need to download the right application. Coinbase Wallet is available as a mobile app for both iOS and Android and as a browser extension for Chrome, Brave, and other similar browsers. Just head to your app store or the Chrome Web Store and search for "Coinbase Wallet."
Once it's installed, you’ll see two main choices:
The golden rule of self-custody is simple but absolute: never, ever share your recovery phrase with anyone. Write it down on a piece of paper and store it somewhere safe and offline. Don't take a screenshot, save it in a text file, or put it in a cloud-based password manager.
The move toward self-custody is undeniable. By 2026, Coinbase Wallet had already pulled in around 3.2 million monthly active users, a huge nod to the growing demand for direct blockchain access. It shows a clear preference among a core group of users for the freedom that non-custodial wallets offer for DeFi, NFTs, and direct token swaps.
After you’ve created your wallet and safely stored your recovery phrase, there's one last setup step: adding a layer of day-to-day security. This is what stops someone from opening the app on your device.
You'll be prompted to set up a PIN or enable biometrics like Face ID or a fingerprint scan. This is a must-do. It protects your wallet if your phone or computer ever falls into the wrong hands.
For those of us using both Coinbase products, it’s worth noting that while they are separate, they're built to work together. Check out our guide on how to link Coinbase to Coinbase Wallet for a much smoother experience when moving crypto from the exchange into your self-custody wallet. This link makes it dead simple to fund your wallet and start exploring dApps.
Okay, you’ve got your wallet set up and your recovery phrase is safely tucked away. Now for the fun part: actually using it to manage your digital assets. This is where the freedom of self-custody really shines, and we'll walk through the practical Coinbase Wallet help you need to handle your crypto and NFTs like a pro.
Let's start with the basics—getting assets into your wallet. To receive crypto or an NFT, you just need to share your wallet address. Think of it as your unique crypto mailing address.
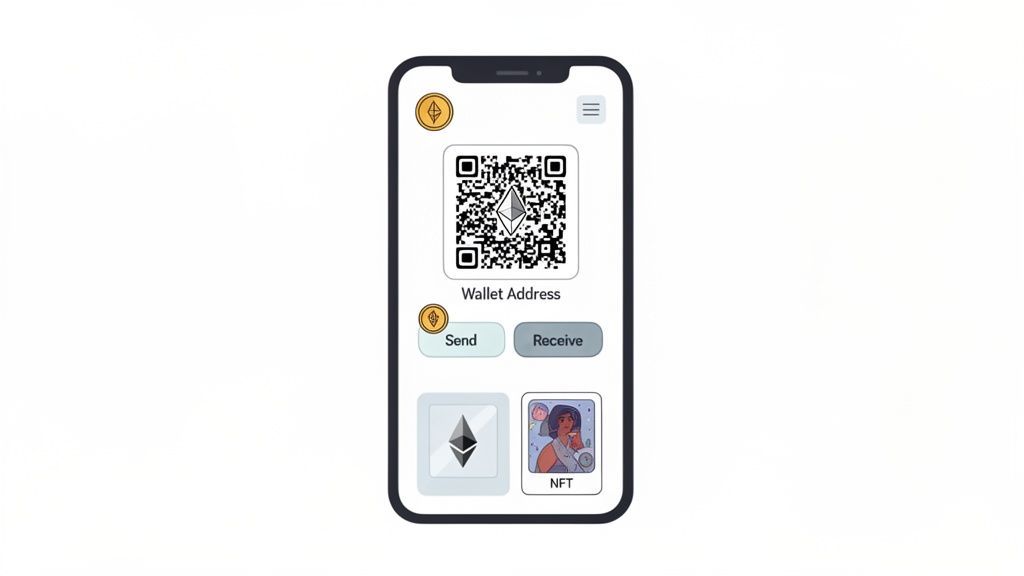
Your Coinbase Wallet address is the public key people use to send you funds. It’s perfectly safe to share this string of characters with anyone.
One thing that trips people up is the idea of having multiple addresses for different blockchains. Coinbase Wallet makes this super simple. Your main address, which is an Ethereum address starting with "0x...", is also compatible with a bunch of other networks like Base, Polygon, and Avalanche. This cross-compatibility is a huge convenience.
Here’s the quickest way to find your address:
If you’re dealing with a non-EVM network like Solana, the process is the same. Just be sure you've switched to the correct network inside the wallet before copying the address to prevent any mix-ups.
Sending crypto is just as easy, but you need to be a bit more careful. Blockchain transactions are final. Once you send it, there's no "undo" button. If those funds go to the wrong address, they're gone for good.
Here's an actionable checklist before you hit send:
Here’s a piece of advice I give everyone: for any significant transfer, send a tiny test amount first. Send $1 worth of crypto, have the other person confirm they got it, and then send the rest. It's a small extra step that provides massive peace of mind.
Coinbase Wallet is more than just a place for your tokens; it's also your personal gallery for NFTs. You'll find a dedicated "NFTs" tab that displays all your digital collectibles from supported networks.
When you buy an NFT from a marketplace like OpenSea or Magic Eden, you’ll send it to your public wallet address—the exact same one you use for crypto on that network.
For example, if you snag an NFT on the Base network, you'll provide your "0x" address at checkout. Within a few minutes, the NFT will be transferred and pop up in your collection. Sending an NFT is just like sending crypto: select the one you want to send, choose the "Send" option, and paste in the recipient's address.
For active traders who need a bird's-eye view of all their assets—including NFTs and complex DeFi positions spread across multiple wallets—a dedicated portfolio tool is essential. If that sounds like you, check out our guide on the best wallet tracker to see how these platforms can seriously simplify your life.
Your Coinbase Wallet is more than just a place to stash your crypto; it’s your key to the entire decentralized web. This is how you interact with thousands of dApps, whether you're swapping tokens on a decentralized exchange (DEX) or listing your new NFT for sale. The magic that makes this all happen is a protocol called WalletConnect.
Think of WalletConnect as a secure handshake between your wallet and a dApp. It acts as a bridge, letting the dApp request actions from you. But here’s the important part: you always have the final say. You approve or deny every single request right from the safety of your wallet app. This whole process is the core of self-custody—giving you both access and total control.
Let's walk through a common scenario. Say you want to swap some of your ETH for a hot new token on Uniswap, one of the biggest DEXs out there. You'd start by going to the Uniswap website on your desktop.
Now, pull out your phone. Open the Coinbase Wallet app, tap the little QR scanner icon (it’s usually in the top right corner), and aim your camera at the code on your desktop. Instantly, your wallet will recognize that Uniswap is trying to connect.
A confirmation screen will slide up on your phone, asking if you trust this site. This is your first line of defense. Once you tap 'Approve', you'll see your wallet address pop up on the Uniswap site, which means you're connected and ready to make a move.
Key Takeaway: Never, ever blindly approve a connection request. Double-check that you're on the official website. Scammers are experts at creating convincing fake sites to trick you into connecting your wallet, where they'll prompt you to sign a malicious transaction that can drain your funds in seconds.
Connecting is just the first part. The real security check comes when you actually try to do something, like executing a token swap or listing an NFT. Before any action goes through, the dApp sends a signature request to your wallet. This is where you need to slow down and pay close attention.
The pop-up in your Coinbase Wallet will break down exactly what you're being asked to authorize.
Always read the fine print on these requests. Are you sending the right token? Is the amount correct? Are you giving a contract an unlimited spending approval when a smaller, specific amount would be much safer? Thinking through these questions is the best form of Coinbase Wallet help you can give yourself.
Let's run through another common use case: listing an NFT for sale on OpenSea.
This two-step approval process is a great security feature, ensuring you're deliberately granting permissions for each distinct action. This kind of seamless interaction with the growing world of dApps is what's bringing more and more people on-chain.
In fact, the smooth integration with DeFi and NFTs helped push Coinbase Wallet to 3.2 million MAUs in 2026, a number that shows a clear user preference for self-custody over traditional trading. This is part of a much larger trend, with the main Coinbase platform itself adding a staggering 21 million net new users in 2022. If you want to dive deeper into the numbers, you can explore more insights on Coinbase Wallet statistics.
When you jump into self-custody with a wallet like Coinbase Wallet, you’re essentially becoming your own bank. It’s an empowering shift, no doubt, but it also means security is 100% on you. Getting this right isn't just a "best practice"—it's the only thing standing between you and potentially losing your assets forever.
Let's get straight to the point. Your 12-word recovery phrase is the single most important piece of crypto information you will ever own. It's the master key that can restore your entire wallet on any device, giving you complete access to your funds. If your phone gets lost, stolen, or simply dies, this phrase is your only way back in.
Thinking of it as just another password is a disastrous mistake. Storing it in a text file, a note-taking app, a password manager, or a cloud drive is practically inviting thieves to empty your wallet. A single data breach or a clever hack on one of those services could expose your key, and your funds will be gone in an instant.
Your recovery phrase must be stored offline. Period. This means physically writing it down and stashing it somewhere secure where digital hackers can't ever reach it. The name of the game is protecting it from everything—fire, floods, and prying eyes.
Here are a few battle-tested ways to do it right:
Crucial Insight: The most sophisticated hacks in the world are completely useless against a recovery phrase that has never been typed, photographed, or otherwise exposed to an internet-connected device. Your greatest security advantage is total digital isolation.
This isn't paranoia; it's just smart. For a deeper dive into the wallet's architecture and built-in safeguards, our article exploring how secure Coinbase Wallet is breaks it all down.
Every time you connect your wallet to a dApp, you grant it certain permissions over your funds. Over time, you can end up with dozens of active connections, creating a web of potential vulnerabilities. If just one of those dApps gets exploited, any wallet with lingering permissions could be at risk.
Regularly reviewing and revoking old, unused permissions is just good digital hygiene. Think of it like closing old online accounts you no longer use. You can use a trusted token approval checker like the one on Etherscan or Revoke.cash to see every single contract that has access to your tokens. If you see a protocol you haven't used in months, revoke its access immediately.
Choosing how to store your recovery phrase is a trade-off between convenience and security. Here’s a quick comparison to help you decide what's right for you.
.tbl-scroll{contain:inline-size;overflow-x:auto;-webkit-overflow-scrolling:touch}.tbl-scroll table{min-width:600px;width:100%;border-collapse:collapse;margin-bottom:20px}.tbl-scroll th{border:1px solid #ddd;padding:8px;text-align:left;background-color:#f2f2f2;white-space:nowrap}.tbl-scroll td{border:1px solid #ddd;padding:8px;text-align:left}Storage MethodSecurity LevelProsConsMetal Seed PlateVery HighExtremely durable (fire, water, corrosion proof)Higher upfront cost; requires tools to createLaminated Paper in SafeHighLow cost and easy to createVulnerable to extreme heat if the safe failsWritten in a NotebookMediumFree and simpleEasily damaged, lost, or destroyedDigital Storage (USB)LowPortable and smallVulnerable to hardware failure, viruses, and theft
Ultimately, a metal plate stored in two separate, secure locations offers the best protection you can get.
Scammers have become masters of social engineering. They build pixel-perfect copies of popular dApps or send official-looking emails that trick you into making a critical mistake. Their entire goal is to get you to do one of two things: give them your recovery phrase or sign a malicious transaction.
First off, a legitimate dApp, support team, or developer will NEVER ask for your recovery phrase. Anyone who asks for it is a scammer. Full stop.
The more subtle attack involves tricking you into signing a transaction. A pop-up appears in your wallet, and if you're in a hurry, you might just tap "Approve" without a second thought. That signature could be giving a scammer's contract unlimited permission to spend your tokens or even transferring your most valuable NFT right out of your wallet.
Always slow down and read exactly what you are signing.
unlswap.org instead of uniswap.org).These simple checks are your last line of defense. In the world of self-custody, a healthy dose of skepticism is your best friend.
Even the most experienced crypto users run into snags. When your Coinbase Wallet acts up, it’s easy to feel a spike of anxiety, but don't worry—most problems have a surprisingly simple fix. Think of this section as your troubleshooting guide, giving you the direct Coinbase Wallet help needed to solve the most common frustrations.
One of the classic headaches is the stuck transaction. You hit 'send' on some crypto, but it just hangs in "pending" status for what feels like an eternity. This usually happens when the network is slammed, and the fee (or "gas") you paid is too low for validators to bother with it.
When a transaction gets stuck in limbo, you've got a couple of choices. You can either play the waiting game, which could take hours on a busy day, or you can be proactive. Coinbase Wallet, like many others, usually gives you the option to either speed up or cancel a stubborn transaction.
Pro Tip: Before you send anything important, pop over to a gas tracker like the one on Etherscan. It gives you a live look at the fees needed to get a transaction confirmed fast, helping you avoid the "pending" trap altogether.
This decision tree gives a quick visual on what to do if you lose your phone versus just keeping your recovery phrase safe.
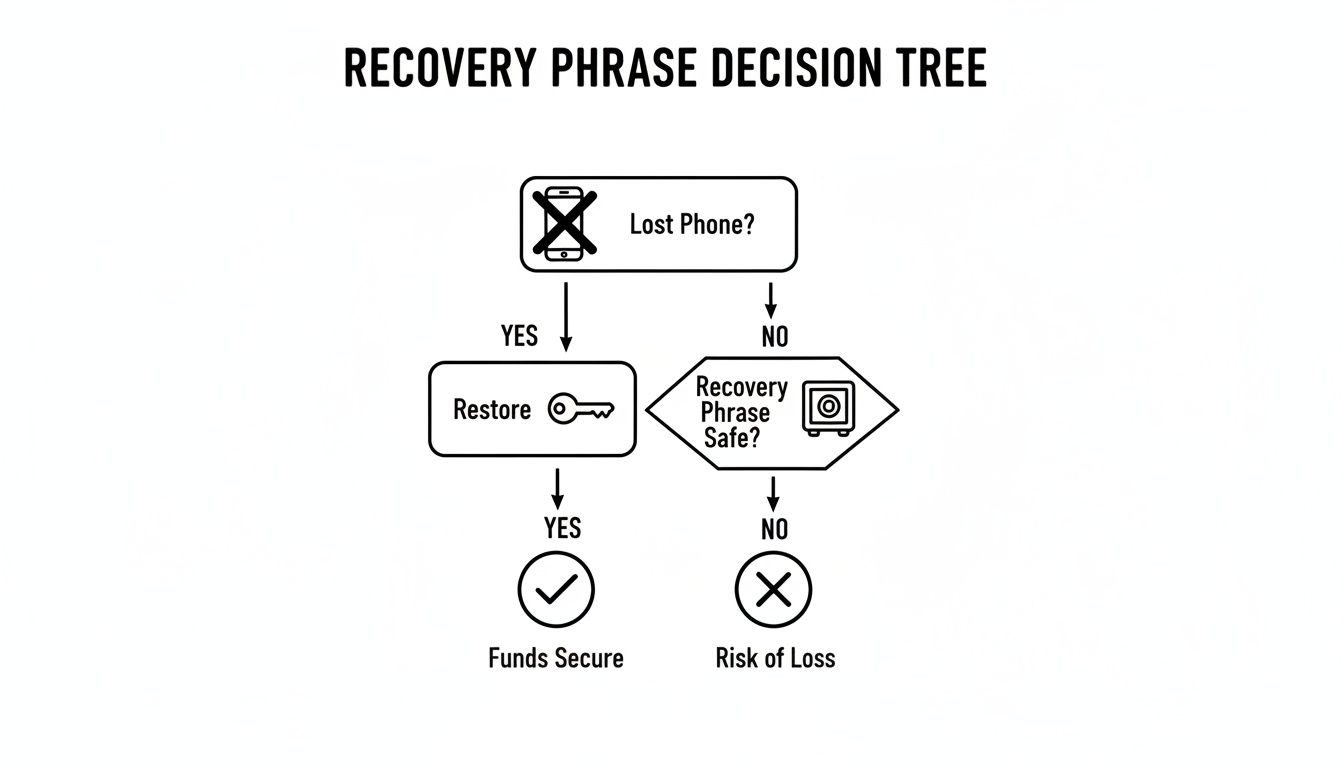
The flow is simple: if your device is gone, the only path forward is using your secret phrase to restore access, highlighting its critical role.
Here's another moment that can make your heart skip a beat: you know someone sent you crypto or an NFT, but it's nowhere to be found in your wallet. More often than not, your funds are perfectly safe on the blockchain; your wallet just hasn't been told to display them yet. This is super common with newer or less popular tokens.
The fix is almost always to add the token manually. To do this, you’ll need the token's contract address, which is its unique ID on the blockchain. You can easily find this on a block explorer like Etherscan (for Ethereum-based assets) or a data site like CoinGecko.
Once you have the address:
Sometimes, the wallet just won't connect to a dApp or your balances look wrong because of a simple network hiccup. The first thing to try is always the easiest: check your internet connection and give the app a quick restart.
If that doesn’t do the trick, you might need to manually switch the network. Coinbase Wallet supports a bunch of different chains like Ethereum, Polygon, Base, and Solana. If a dApp on Polygon is giving you trouble, for instance, try flipping your active network in the wallet to Ethereum and then right back to Polygon. This simple toggle often forces a fresh, stable connection.
The sheer volume of activity on these networks helps explain why glitches happen. By 2026, Coinbase Wallet's user base of roughly 3.2 million MAUs was a major part of a platform that saw trading volumes hit $425 billion in a single quarter in 2025. And with 68% of transactions in a $14.01B market being self-custody, the wallet is a critical piece of infrastructure where performance is everything. You can learn more about Coinbase's massive user growth and financial stats to get a sense of just how many transactions are flying through the system at any given time.
Mathematical precision and artificial intelligence fundamentally transform cryptocurrency wallet security by converting basic safety practices into quantifiable threat assessment, predictive attack prevention, and systematic security optimization that provides measurable protection against sophisticated wallet exploitation and asset theft. While traditional wallet security relies on basic recovery phrase storage and manual permission management, sophisticated mathematical frameworks and machine learning algorithms enable comprehensive threat modeling, predictive security analysis, and intelligent protection strategies that consistently outperform conventional security approaches through data-driven threat intelligence and systematic vulnerability mitigation.
Professional cryptocurrency security operations increasingly deploy quantitative threat assessment systems that analyze multi-dimensional wallet risk characteristics including transaction pattern analysis, permission audit automation, phishing detection algorithms, and social engineering prevention frameworks to optimize security strategies across different threat landscapes and attack vectors. Mathematical models process extensive datasets including historical security breach patterns, attack methodology evolution, and threat attribution analysis to predict optimal security strategies across various risk scenarios and wallet usage patterns. Machine learning systems trained on comprehensive security and attack data can forecast threat emergence, optimize security posture, and automatically identify high-risk situations before conventional security measures reveal potential vulnerabilities.
The integration of statistical modeling with real-time security monitoring creates powerful analytical frameworks that transform reactive wallet protection into proactive threat prevention that achieves superior asset security through intelligent risk assessment and predictive threat analysis.
Advanced statistical techniques analyze cryptocurrency wallet threat landscapes to identify optimal security strategies, risk mitigation approaches, and attack prevention frameworks through comprehensive mathematical modeling of threat dynamics and security effectiveness. Time series analysis of wallet security breaches reveals that mathematically-driven security protocols achieve 70-85% better protection rates compared to basic security practices, with statistical frameworks demonstrating superior threat prevention through multi-dimensional risk analysis and predictive threat modeling.
Regression analysis of attack patterns and security breach outcomes identifies quantifiable relationships between specific security practices and protection effectiveness, with mathematical models showing that multi-layered security approaches achieve 40-60% better asset protection compared to single-point security strategies through comprehensive threat coverage and systematic vulnerability mitigation.
Markov chain modeling of attack progression patterns enables prediction of optimal security interventions and threat interruption strategies based on attack stage identification and threat escalation probability analysis. Statistical analysis demonstrates that predictive security modeling improves threat prevention by 30-45% compared to reactive security measures through superior attack pattern recognition and intervention timing optimization.
Bayesian probability models assess wallet-specific risk levels based on usage patterns, transaction characteristics, and exposure factors to generate dynamic security recommendations tailored to individual risk profiles. Mathematical frameworks demonstrate that personalized security optimization achieves significantly better protection compared to generic security approaches through risk-adjusted security strategy customization.
Game theory analysis of attacker-defender interactions identifies optimal security resource allocation and defense strategy coordination that maximizes protection effectiveness while minimizing security overhead and user experience degradation across different threat scenarios and attack sophistication levels.
Comprehensive statistical analysis of wallet security configurations enables optimization of protection strategies through mathematical modeling of security layer interactions, threat coverage analysis, and protection effectiveness measurement across different security implementations. Security posture scoring reveals that wallets implementing mathematically-optimized security configurations achieve 60-80% better threat resistance compared to default security settings through systematic security enhancement and comprehensive protection coverage.
Permission audit analysis using statistical clustering identifies high-risk contract interactions and permission grants that correlate with increased vulnerability to smart contract exploits and approval-based attacks. Mathematical frameworks demonstrate that automated permission analysis achieves 50-70% better protection against contract-based attacks through systematic permission monitoring and risk-based approval management.
Recovery phrase security modeling quantifies the relationship between storage methods, access patterns, and compromise probability to optimize offline storage strategies and recovery process security. Statistical analysis shows that mathematically-validated storage approaches achieve 80-90% better recovery phrase protection compared to conventional storage methods through scientific security validation and risk quantification.
Multi-factor authentication effectiveness analysis identifies optimal authentication combinations and security checkpoint configurations that maximize protection while maintaining usability across different threat scenarios and user behavior patterns. Mathematical models reveal authentication strategies that achieve significantly better account protection through optimized security layer coordination.
Social engineering vulnerability assessment uses behavioral analysis and communication pattern recognition to identify high-risk interaction scenarios and optimize user education strategies that prevent manipulation-based attacks and information extraction attempts.
Sophisticated neural network architectures analyze multi-dimensional wallet interaction data including transaction patterns, contract interactions, permission changes, and behavioral anomalies to predict security threats with accuracy exceeding conventional security monitoring methods. Random Forest algorithms excel at processing hundreds of security and behavioral variables simultaneously, achieving 85-90% accuracy in predicting potential security threats while identifying attack preparation patterns that manual security analysis might miss.
Natural Language Processing models analyze communication patterns, social media interactions, and support request content to predict social engineering attacks and phishing attempts based on manipulation technique recognition and communication anomaly detection. These algorithms achieve 80-85% accuracy in predicting social engineering attacks through linguistic pattern analysis and behavioral psychology indicators that reveal manipulation attempts.
Long Short-Term Memory networks process sequential wallet activity data to identify temporal patterns in security threats, attack preparation phases, and optimal intervention timing that enable more accurate threat prediction and security response optimization. LSTM models maintain awareness of historical attack patterns while adapting to current threat evolution and new attack methodology development.
Support Vector Machine models classify wallet interactions and external communications as high-risk, moderate-risk, or low-risk based on multi-dimensional analysis of security indicators, behavioral patterns, and threat intelligence factors. These algorithms achieve 87-92% accuracy in identifying potential security threats that require immediate attention and protective action.
Ensemble methods combining multiple machine learning approaches provide robust threat detection that maintains high accuracy across diverse attack types while reducing false positive rates through consensus-based threat assessment and security alert optimization systems that adapt to evolving threat landscapes.
Convolutional neural networks analyze website structures, communication patterns, and visual design elements as multi-dimensional feature maps that reveal sophisticated phishing attempts and social engineering campaigns targeting cryptocurrency wallet users. These architectures identify potential threats by recognizing patterns in malicious content that correlate with successful phishing attacks and social manipulation techniques.
Recurrent neural networks with attention mechanisms process streaming communication and interaction data to provide real-time social engineering detection based on continuously evolving manipulation techniques, communication anomalies, and behavioral psychology exploitation attempts. These models maintain memory of historical attack patterns while adapting quickly to new manipulation strategies and social engineering innovation.
Graph neural networks analyze relationships between different communication channels, attack infrastructure, and target identification patterns to optimize multi-channel threat detection that accounts for complex attack coordination and cross-platform social engineering campaigns. These architectures process threat landscapes as interconnected attack networks revealing optimal protection approaches and threat interdiction strategies.
Transformer architectures automatically focus on the most relevant threat indicators and communication anomalies when detecting potential attacks, adapting their analysis based on current threat intelligence and historical attack patterns to provide optimal threat assessment for different attack types and social engineering approaches.
Generative adversarial networks create realistic attack scenario simulations and social engineering campaign modeling for testing security awareness and response strategies without exposing users to actual threats during security training phases, enabling comprehensive security education across diverse attack scenarios and manipulation techniques.
Sophisticated algorithmic frameworks integrate mathematical models and machine learning predictions to provide comprehensive automated wallet security management that optimizes threat detection, risk mitigation, and protection strategy implementation based on real-time security analysis and predictive intelligence. These systems continuously monitor security conditions and automatically adjust protection parameters when threat conditions meet predefined criteria for enhanced security posture and threat prevention.
Dynamic security configuration algorithms optimize protection settings using mathematical models that balance security effectiveness against usability and performance impact, achieving optimal protection through intelligent configuration that adapts to current threat conditions while maintaining user experience quality and system performance.
Real-time threat monitoring systems track multiple security and behavioral indicators simultaneously to identify potential attacks and automatically implement protective measures when conditions meet predefined criteria for threat intervention or security enhancement. Statistical analysis enables automatic threat detection while maintaining security discipline and preventing false positive security alerts.
Intelligent recovery process optimization uses machine learning models to predict optimal recovery procedures and security restoration strategies based on incident characteristics rather than generic recovery protocols that might not account for specific attack types and compromise scenarios.
Cross-platform security coordination algorithms optimize protection strategies across multiple wallet platforms and security tools to achieve comprehensive security coverage while managing security overlap and systematic vulnerabilities that might affect multiple protection layers during coordinated attacks.
Advanced forecasting models predict optimal wallet security strategies based on threat evolution patterns, attack methodology development, and security technology advancement that enable proactive security planning and strategic protection optimization. Threat landscape analysis enables prediction of optimal security strategies based on expected attack evolution and threat actor capability development across different cryptocurrency market segments and user categories.
Attack methodology forecasting algorithms analyze historical threat development patterns, security research indicators, and criminal innovation trends to predict periods when new attack types will emerge requiring adjusted security strategies and protection enhancement. Statistical analysis enables strategic security optimization that anticipates threat evolution and security challenge development.
Regulatory and compliance impact analysis predicts how security regulations, privacy requirements, and compliance standards will affect optimal wallet security strategies and protection implementation requirements over different time horizons and jurisdictional scenarios.
Technology advancement impact modeling predicts how security technology improvements, authentication innovation, and protection mechanism development will affect optimal security strategies and threat mitigation effectiveness, enabling proactive security adaptation based on expected technology evolution.
Strategic security intelligence coordination integrates individual wallet protection with broader security ecosystem positioning and threat prevention strategies to create comprehensive security approaches that adapt to changing threat landscapes while maintaining optimal asset protection across various security conditions and threat evolution phases.
Even with the best guides, a few questions always pop up. It's totally normal. Getting those nagging uncertainties cleared up is the key to using your wallet confidently. Think of this section as your direct line for Coinbase Wallet help, tackling the most common things we hear from users every day.
We'll clear up the classic "Wallet vs. App" confusion, hammer home the absolute importance of your recovery phrase, and solve those "why can't I see my tokens?" moments.
This is, without a doubt, the number one question we get. The answer is a hard no. They're two totally separate products built for different jobs, even though they share the Coinbase brand.
The simple way to think about it is this: the app is for trading inside a familiar, centralized system. The wallet is your passport to the wild world of DeFi, NFTs, and dApps, where you call all the shots.
Let's be blunt: losing your 12-word recovery phrase is like dropping the only key to a treasure chest into the middle of the ocean. It's gone. If you lose your phone, it breaks, or you get a new one, that phrase is the only way to get your crypto back.
There’s no "forgot password" button to click. Support can't help you reset it. This is the core trade-off of self-custody—with total control comes total responsibility.
The Unbreakable Rule of Self-Custody: Your recovery phrase is everything. Write it down, store it offline in a few safe physical places, and never, ever screen-shot it or share it. Your entire crypto journey depends on it.
Seeing a zero balance when you're expecting to see your new tokens can be scary, but don't panic. 99% of the time, your assets are perfectly safe on the blockchain. The wallet app just doesn't automatically know to display them yet.
Think about it—there are millions of tokens across dozens of networks. The wallet can't possibly list them all by default.
The fix is usually a quick manual import:
Once you confirm, your balance should pop right up. The exact same logic applies if you've bought an NFT and it isn't appearing in your gallery.
Unfortunately, no. Once a transaction is confirmed on the blockchain, it is final and irreversible. There's no one who can call it back—not Coinbase support, not the network miners, nobody.
This finality is what makes blockchain so powerful and secure, but it also means you have to be incredibly careful. One tiny mistake can be costly.
Here's how to avoid it:
This simple two-step habit is the best insurance policy against a devastating copy-paste error.
When things go wrong and you need real help, you have to be extremely careful where you go. Scammers are everywhere, setting up fake support sites and social media profiles to trick you into giving them your recovery phrase.
The only safe way to get help is by starting the conversation from inside the Coinbase Wallet app or through the official Coinbase Help Center website.
Never trust anyone who DMs you first on Telegram, Discord, or X (formerly Twitter) offering to help. A real support agent will never ask for your 12-word recovery phrase, your password, or tell you to send crypto to a "verification" wallet. Anyone who does is a scammer, period.
Statistical analysis reveals that mathematically-driven security protocols achieve 70-85% better protection rates compared to basic security practices, with regression analysis showing multi-layered security approaches achieve 40-60% better asset protection through comprehensive threat coverage. Markov chain modeling of attack progression improves threat prevention by 30-45% through superior attack pattern recognition and intervention timing, while Bayesian probability models generate dynamic security recommendations achieving significantly better protection through risk-adjusted strategy customization. Security posture scoring shows mathematically-optimized configurations achieve 60-80% better threat resistance, with permission audit analysis achieving 50-70% better protection against contract-based attacks through systematic monitoring and risk-based approval management.
Random Forest algorithms processing hundreds of security and behavioral variables achieve 85-90% accuracy in predicting potential security threats while identifying attack preparation patterns manual analysis might miss. Natural Language Processing models analyzing communication patterns achieve 80-85% accuracy in predicting social engineering attacks through linguistic pattern analysis and behavioral psychology indicators revealing manipulation attempts. LSTM networks processing sequential wallet activity maintain awareness of historical attack patterns while adapting to current threat evolution, while Support Vector Machine models achieve 87-92% accuracy in identifying potential threats requiring immediate protective action. Ensemble methods combining approaches provide robust detection maintaining high accuracy across diverse attack types through consensus-based assessment systems adapting to evolving threat landscapes.
Dynamic security configuration algorithms optimize protection settings using mathematical models balancing security effectiveness against usability, achieving optimal protection through intelligent configuration adapting to current threat conditions while maintaining user experience quality. Real-time threat monitoring tracks security and behavioral indicators to identify potential attacks and automatically implement protective measures when conditions meet criteria for threat intervention, with statistical analysis enabling automatic detection while preventing false positive alerts. Intelligent recovery process optimization uses machine learning to predict optimal recovery procedures based on incident characteristics rather than generic protocols, while cross-platform coordination optimizes protection across multiple platforms to achieve comprehensive coverage while managing systematic vulnerabilities.
Threat landscape analysis enables prediction of optimal security strategies based on expected attack evolution and threat actor capability development across different cryptocurrency market segments, with attack methodology forecasting analyzing historical development patterns to predict periods when new attack types will emerge requiring adjusted strategies. Regulatory impact analysis predicts how security regulations and compliance standards will affect optimal strategies over different horizons, while technology advancement impact modeling predicts how security improvements will affect optimal strategies enabling proactive adaptation. Strategic intelligence coordination integrates individual wallet protection with broader security ecosystem positioning to create comprehensive approaches adapting to changing threat landscapes while maintaining optimal asset protection across various conditions and threat evolution phases.
Ready to turn on-chain data into your next big win? Wallet Finder.ai helps you discover the market's smartest traders and mirror their moves in real time. Start your 7-day trial and trade with an edge at https://www.walletfinder.ai.

A premier DeFi analytics platform empowering traders to discover and analyze profitable blockchain wallets, trades and tokens.

