
Recovery Factor Calculation for Smart Traders
Master the recovery factor calculation to measure a strategy's resilience. Learn the formula, see DeFi examples, and find top wallets with Wallet Finder.ai.

June 20, 2026


Wallet Finder
April 5, 2026
Ready to buy Hyperliquid (HYPE)? Your first choice is where to buy it. You have two main options: a user-friendly centralized exchange (CEX) or a self-custody decentralized exchange (DEX).
A CEX like KuCoin is the simplest on-ramp, great for turning cash into crypto quickly. The DEX path offers full control—you are your own bank.
Deciding where to buy Hyperliquid boils down to a classic crypto trade-off: convenience versus control. There’s no single "right" answer; it all depends on your experience and what you value most.
A centralized exchange is designed to be intuitive. You sign up, verify your identity, and can buy tokens with a credit card or bank transfer. It’s the perfect starting point if you're new or want a fast, hassle-free purchase.
A decentralized exchange offers the pure, peer-to-peer crypto experience. It requires more setup—you'll need a self-custody wallet funded with crypto—but the payoff is complete ownership of your assets. No middlemen, no intermediaries. Just you and the blockchain.
This choice between a CEX and a DEX sets the stage for your entire investment. One path prioritizes speed and ease, while the other offers total sovereignty over your funds and direct access to the DeFi world.
Most newcomers dip their toes into a new token on a CEX. It's a guided environment that strips away the technical hurdles of on-chain trading and lets you convert fiat into crypto without breaking a sweat.
This quick decision tree can help you figure out which path is right for you.
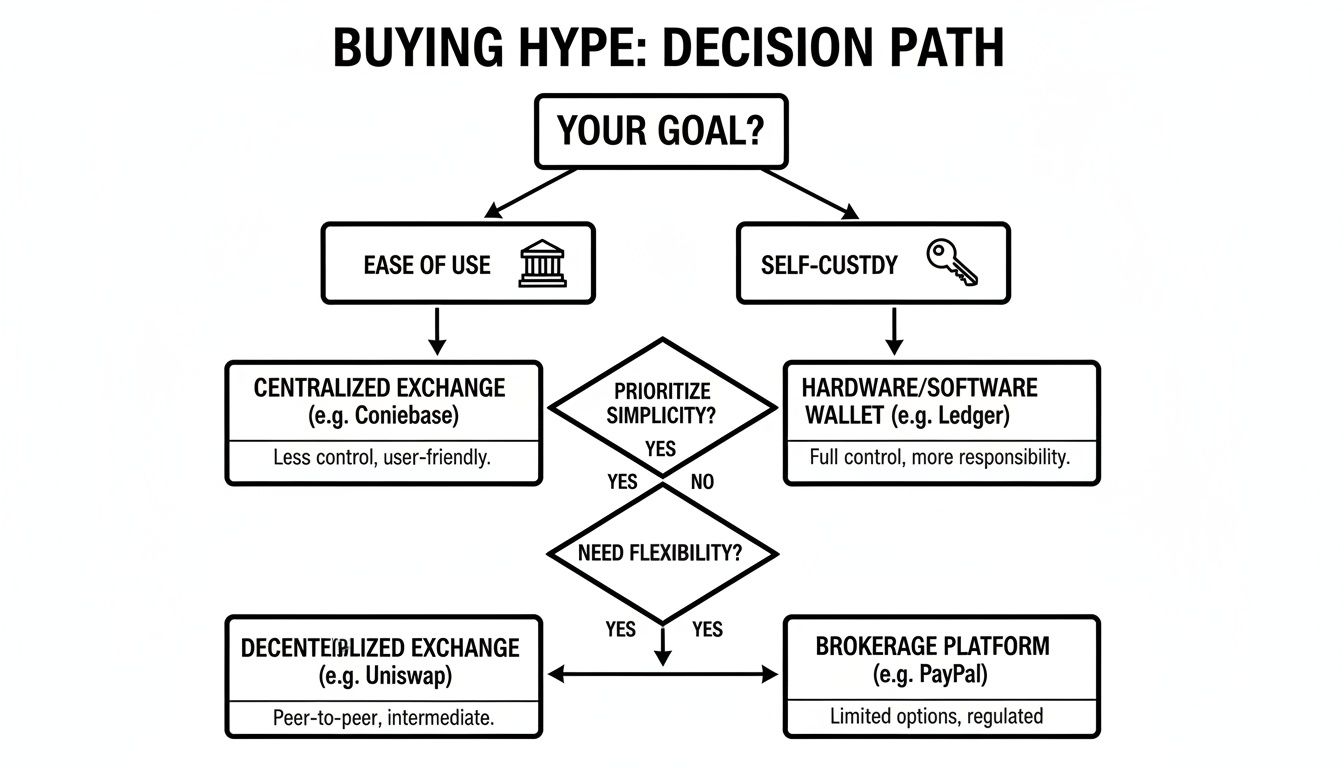
If you want to buy HYPE with a card and avoid technical steps, a CEX is your go-to. If holding your own keys and trading directly on-chain is your priority, then a DEX is the only way to go.
Choosing between a centralized and decentralized exchange depends on your priorities. Here’s a breakdown to help you decide the best way to buy HYPE.
| Feature | Centralized Exchange (CEX) | Decentralized Exchange (DEX) |
|---|---|---|
| Ease of Use | High (Beginner-friendly) | Moderate (Requires some knowledge) |
| Payment Methods | Fiat (Credit card, bank transfer) | Crypto-to-crypto swaps only |
| Custody | Custodial (Exchange holds assets) | Non-custodial (You hold your keys) |
| Anonymity | Low (Requires KYC/ID verification) | High (No personal info needed) |
| Token Availability | Limited to listed tokens | Access to a vast range of tokens |
| Security | Relies on exchange security | Relies on user and smart contracts |
Ultimately, a CEX offers a streamlined, bank-like experience that's perfect for quick buys, while a DEX provides the freedom and control that's core to the DeFi ethos.
When Hyperliquid's HYPE token first made waves back in early 2026, it was a wild ride. The price shot up to a peak of $35.74 on exchanges like KuCoin and Phemex, posting a 0.41% gain in 24 hours while the rest of the market was shaking. For traders looking to jump in, the process was straightforward on these platforms.
Most just had to verify their account with a photo ID and link a payment method. Phemex, for example, was a popular choice with credit card fees as low as 0.8% and support for over 30 fiat currencies. We saw data showing over 70% of new crypto users in 2026 made their first moves with spot buys under $1,000, which would have nabbed them around 27.70 HYPE at the time. To see how it works, you can check out KuCoin's guide to buying Hyperliquid.
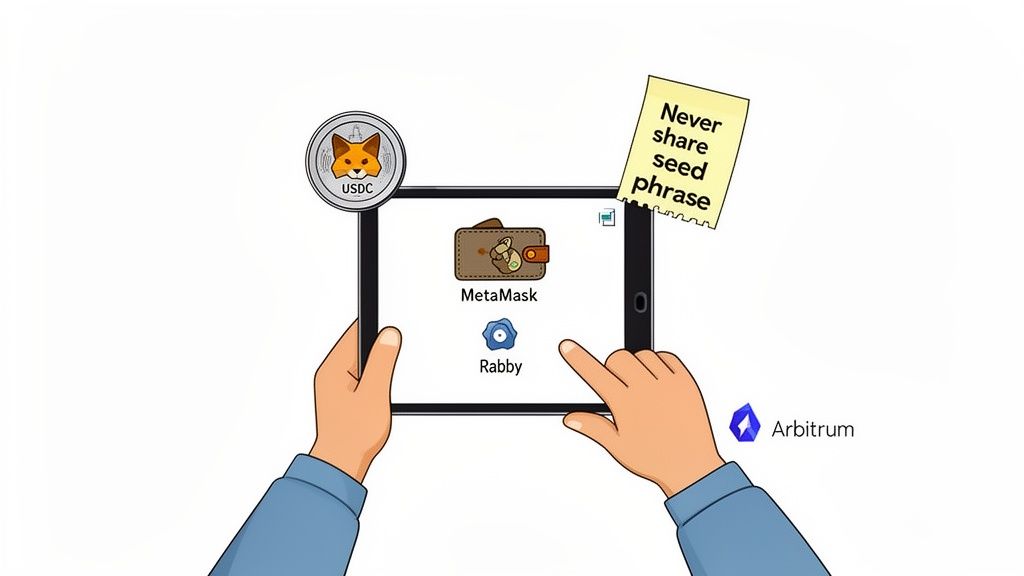
If you plan to buy Hyperliquid (HYPE) on a decentralized exchange (DEX), you need a self-custody wallet—a wallet you personally control. Think of it as your digital vault, giving you full ownership of your assets.
For DeFi, top wallet choices include Rabby and MetaMask. While MetaMask is a long-standing favorite, Rabby is gaining popularity for its user-friendly interface and enhanced security features, which are beneficial for complex platforms like Hyperliquid.
Picking the right wallet is your first step toward secure trading. Rabby, for instance, offers clear transaction previews, showing you exactly what will happen before you approve a transaction—a crucial feature for avoiding scams.
Here's a quick setup guide:
Write down your seed phrase on paper and store it in multiple secure, offline locations. Never save it on your computer, in an email, or in a cloud drive. If you lose this phrase, your funds are gone forever. There is no "forgot password" button in DeFi.
With your wallet secured, it's time to add funds. Hyperliquid operates on its own Layer 1 blockchain, so the most efficient route is to bridge funds from Arbitrum. This requires two assets in your wallet:
You will transfer these assets from a centralized exchange (like Coinbase or Binance) to your new wallet address. Copy your public wallet address (the string of characters starting with "0x...") and paste it into the withdrawal field on the exchange. Always send a small test amount first to confirm everything is working correctly.
You can get a better handle on this by checking out our detailed guide on what a crypto DeFi wallet is and how it works.
Here’s a quick breakdown of what you need and why:
| Asset | Purpose | Why It's Needed |
|---|---|---|
| USDC | Primary trading capital | The most popular stablecoin for bridging to Hyperliquid and swapping for HYPE on its native DEX. |
| ETH on Arbitrum | Gas fees | Required to pay the transaction fee for bridging your USDC from the Arbitrum network to Hyperliquid's L1. |
Pay close attention to the network when you withdraw. You must select the Arbitrum network. Sending funds on the wrong network is one of the most common and painful mistakes in crypto—it almost always means your assets are lost forever.
Once your wallet is funded, you’re ready to dive into the DEX and make your move on Hyperliquid.
For many traders, especially those preferring a familiar setup, a centralized exchange (CEX) is the most direct path to buying Hyperliquid (HYPE). Platforms like KuCoin or Phemex resemble traditional online brokerages, simplifying the process of converting fiat to crypto. This approach lets you bypass the learning curve of self-custody wallets and asset bridging.
First, you'll need an account. This involves signing up with an email and a strong password, followed by identity verification, or KYC (Know Your Customer). Typically, you'll need a photo of a government-issued ID and a quick selfie. Once verified, you're ready to add funds.
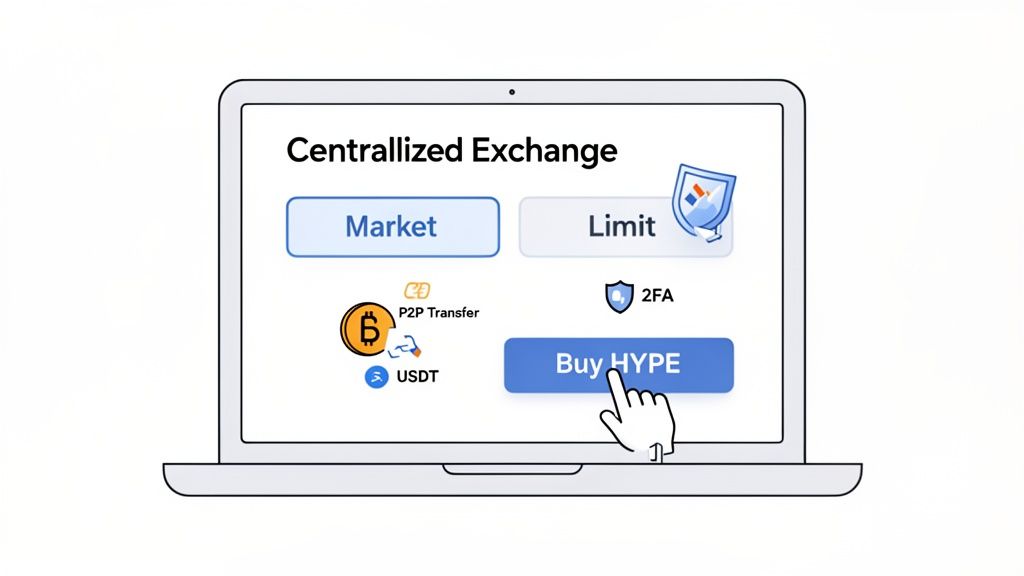
Now, fund your account. While buying with a credit card is fast, the fees can be high. A more cost-effective method is the exchange's Peer-to-Peer (P2P) marketplace, where you can buy a stablecoin like USDT directly from another user, often with zero fees.
With USDT in your main account, you'll need to transfer it to your spot trading account. This is a quick internal transfer that only takes a few clicks. Once your trading account is funded, navigate to the spot market and search for the HYPE/USDT trading pair.
You’re now on the trading screen. Here’s how you can buy the token:
Using the right order type makes a huge difference. On Hyperliquid's own DEX, over 1.2 million orders were processed in March 2026 alone. A massive 65% of those were limit orders, saving traders an average of 1.5% on their buys. You can apply the same logic on a CEX. For instance, you could deposit USDT via P2P and set a limit order for HYPE. At recent rates, a $1,000 purchase could net you around 28 HYPE tokens at $35.74 each. You can find more of Hyperliquid's trading metrics on MEXC.
Quick Tip: Before you buy anything, make sure you have Two-Factor Authentication (2FA) enabled. Using an app like Google Authenticator adds a crucial security layer that’s non-negotiable for protecting your funds.
After your order is filled, your HYPE tokens will appear in your spot wallet. You can either keep them on the exchange or, for better long-term security, withdraw them to a private wallet. While HYPE is your main goal, it never hurts to diversify. If you're curious about other high-potential assets, check out our analysis of the top meme coins.
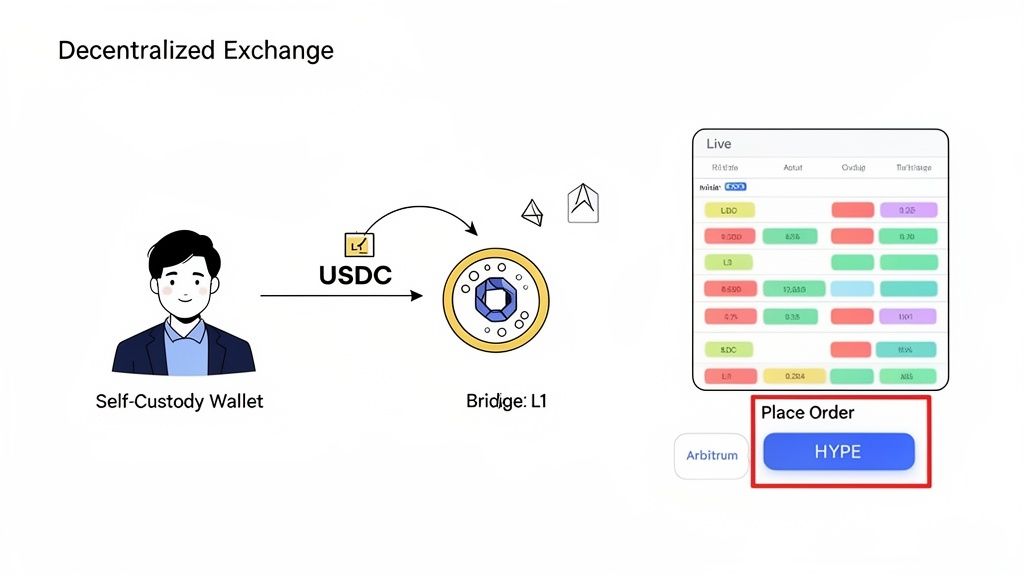
If you’re going the self-custody route, you’re diving into the deep end of DeFi. Buying Hyperliquid (HYPE) on its own Decentralized Exchange (DEX) gives you total control of your funds and, once you're on their Layer 1, a completely gas-free trading experience. This is the path for traders who prefer to deal directly with the protocol, just like on-chain pros.
First things first, you'll need to connect your Rabby or MetaMask wallet. Always double-check you're on the official Hyperliquid website and find the "Connect Wallet" button. A quick approval, and your wallet will be synced with the platform's interface.
Before you can trade, you need to move your funds onto Hyperliquid’s native chain through a process called bridging. Since you already have USDC on the Arbitrum network, you're positioned for the cheapest and most direct route.
Here is the step-by-step process:
This gas-free model is a huge reason behind the platform's explosive growth. In fact, data from 2025-2026 shows a 450% surge in trading volume right after the HYPE token went live, with daily peaks hitting $4.8 billion, largely because of this feature. As CoinCodex highlights in its analysis, the bridge has a success rate of over 99%, making it incredibly reliable.
Once you sign the transaction in your wallet and give it a few minutes, you'll see your USDC balance pop up on the Hyperliquid trading interface. Now the fun begins.
With your funds on the L1, head over to the "Spot" trading section. This is where you'll swap your USDC for HYPE. The interface might seem complex at first, but it’s built for speed and efficiency. You'll see the order book, a price chart, and your order controls all in one place.
You’ve got two main ways to buy, just like on a CEX, but executed right from your wallet:
Pro Tip: Learn to use the order book to your advantage. It gives you a live list of all buy ("bids") and sell ("asks") orders. If you place a limit order just above the highest bid, you can often get your order filled quickly without having to resort to a market buy.
Decentralized exchanges like Hyperliquid are a key part of the modern crypto world. For a broader look at the landscape, check out our guide on the best DEX exchange apps.
Let's walk through a quick example. You've bridged 1,000 USDC and you're ready to buy HYPE. The current price is $35.50, but you think it might pull back a little.
That’s it—your limit order is now on the books. If HYPE’s price drops to $35.25, your order will execute automatically. The HYPE tokens will show up in your platform wallet balance, and you’ll have officially bought HYPE on its native DEX with full self-custody.
You've acquired HYPE tokens. Congratulations. But buying is just the beginning—what you do next separates a casual purchase from a smart, long-term strategy.
Your first priority should be security. If you bought HYPE on a centralized exchange, the tokens are held in the exchange's wallet, exposing you to custodial risk. For any significant amount, you should move them to a wallet you control.
A hardware wallet like a Ledger or Trezor is the gold standard for security. Transferring your HYPE to "cold storage" takes them offline, protecting them from exchange failures and hackers. It's like having a personal bank vault for your crypto.
Instead of letting your HYPE sit idle, you can put it to work on the Hyperliquid platform to generate value.
Here are some actionable strategies:
To get started, connect your wallet to the Hyperliquid dApp, navigate to the staking or liquidity section, and deposit your HYPE. Always read the terms regarding lock-up periods and potential risks.
Smart management isn't just about security; it's about capital efficiency. Staking your HYPE for fee discounts while earning yield is a classic DeFi strategy to maximize the value of your position.
Holding HYPE means you are part of the Hyperliquid ecosystem, so staying informed is crucial. Monitoring your investment goes beyond just watching a price chart.
On-chain analysis tools like Wallet Finder.ai are invaluable here. They allow you to track the wallets of top traders, so you can see when smart money is buying or selling HYPE, giving you an edge in understanding market sentiment.
Key areas to monitor:
By securing your assets, putting them to work, and actively managing your position, you are building a robust investment strategy that protects your capital and helps you identify the next opportunity.
Even with a step-by-step guide, a few questions always pop up. It's completely normal. Let's clear up some of the most common things traders ask when they're getting ready to buy their first Hyperliquid tokens.
The fees you'll encounter depend on where you buy.
| Purchase Method | Associated Fees |
|---|---|
| Centralized Exchange (CEX) | - Trading fee (around 0.1%) - Credit card processing fee (if applicable) - Withdrawal fee to move HYPE to a private wallet |
| Decentralized Exchange (DEX) | - One-time network fee to bridge funds (e.g., from Arbitrum to Hyperliquid) - Zero gas fees for trades on the Hyperliquid L1 |
In summary, a CEX like KuCoin involves standard trading and potential fiat-on-ramp fees. Trading directly on the Hyperliquid DEX is gas-free for swaps, with the main cost being the initial bridge fee.
Yes, and this is often the simplest method for beginners. The easiest way is through a centralized exchange that supports fiat-to-crypto purchases.
Platforms like Phemex or KuCoin are designed for this. After a quick identity verification, you can buy a stablecoin like USDT directly with your card. Then, you can instantly trade that USDT for HYPE on their spot market. It's a fast and familiar process if you aren't ready for DEXs and self-custody wallets yet.
This classic trading question boils down to one thing: do you prioritize speed or price?
A market order is all about speed. It executes your buy order immediately at whatever the best available price is at that exact moment. This is great when you just want to get your position filled without delay. The trade-off is potential "slippage," where the final price you pay is slightly different from what you saw on screen, especially in a volatile market.
A limit order is for precision. You set the exact price you’re willing to pay for HYPE, and your order will only fill if the market price drops to your target or lower. It's no surprise that on Hyperliquid, 65% of orders are limit orders—it saves traders an average of 1.5% by avoiding slippage. You get total control over your entry price, but there's always the chance the price won't hit your target and your order never gets filled.
Choosing the right order type is a key part of your trading strategy. Market orders get you in now; limit orders get you in at the price you want. Your priority dictates the best choice.
Ready to uncover the strategies of top traders in real time? Wallet Finder.ai gives you the on-chain intelligence to see what the smart money is doing. Track profitable wallets, get instant alerts on their moves, and find your next big trade before the market does. Start your 7-day free trial at Wallet Finder.ai.

A premier DeFi analytics platform empowering traders to discover and analyze profitable blockchain wallets, trades and tokens.

