
Recovery Factor Calculation for Smart Traders
Master the recovery factor calculation to measure a strategy's resilience. Learn the formula, see DeFi examples, and find top wallets with Wallet Finder.ai.

June 20, 2026


Wallet Finder
February 14, 2026
The SafeMoon V2 (SFM) price chart isn't for the faint of heart. It’s notoriously volatile, driven by a complex set of internal rules rather than the usual market pressures. In fact, its history includes a jaw-dropping price collapse of over 99.95% from its peak, a clear signal that your standard trading playbook won’t cut it here.
Before you buy a single SFM token, here's what you absolutely need to know. SafeMoon V2 isn't like Bitcoin or Ethereum—it operates under completely different rules that can either help you or destroy you.
First, understand the 10% transaction tax. Every time you buy, sell, or even transfer SFM between your own wallets, you lose 10% immediately. This means your investment needs to gain at least 11% just to break even after one buy. If you're planning to sell later, you'll pay another 10% on the way out. That's a 20% round-trip cost before you've made a single penny in profit.
Second, check the liquidity before you trade. SafeMoon's trading volume has collapsed from millions per day to often under $100K. This means even a $5,000 trade can move the price 5-10%. When you try to sell, you might face slippage of 15-30%, meaning you get far less than the "price" you see listed.
Third, verify you're buying the correct contract. Scammers have created dozens of fake SafeMoon tokens with nearly identical names and logos. The official SafeMoon V2 contract address on BSC is crucial to verify on BSCScan before any purchase. One wrong character and your money goes straight to scammers.
Fourth, set your slippage correctly or your transaction will fail. You need at least 12% slippage on PancakeSwap to account for the 10% tax plus normal price movement. Anything less and you'll waste gas fees on failed transactions.
Fifth, never invest more than 1-2% of your portfolio. SafeMoon V2 is down 99.95% from its all-time high of $0.007232. That's not a typo—it lost 99.95% of its value. If you bought at the peak with $10,000, you'd have $5 worth today. This is an extremely high-risk speculation, not an investment.
Sixth, understand that reflections (passive rewards) are virtually worthless at current volumes. During the 2021 peak, holders earning $50-100 daily from reflections. Today, you might earn $0.10 per month on a $1,000 position. The math doesn't work anymore.
Finally, have an exit plan before you enter. Set stop-losses at 25-30% maximum loss. Take profits at 50%, 100%, and 200% gains if you're lucky enough to catch a pump. Don't marry your bags hoping for a return to all-time highs—it won't happen.
If you want to understand the SafeMoon V2 price, you have to look beyond the typical charts. SFM was never meant to be a conventional cryptocurrency. It was built with unique tokenomics that directly shape its value with every single transaction. Because of this, on-chain data tells a much richer story than a simple price graph ever could.
Traditional market analysis just doesn't work here. It completely misses the core mechanics hard-coded into the SFM smart contract. To make any sense of the price swings, you have to get your hands dirty and look at the data generated by the blockchain itself.
At its core, SafeMoon V2 runs on three key mechanisms that create its own little economic ecosystem:
These features mean the real drivers of the safemoon price v2 are trading volume, how long people hold, and how quickly the supply is shrinking.
For traders, this is a game-changer. Watching metrics like the burn rate and the growth in new wallets gives you a much clearer picture of market sentiment than just looking at the price. A rising burn rate means more activity, while reflections show you how rewards are being distributed across the network.
Think of this guide as your practical playbook for moving beyond pure speculation. Instead of just guessing, you'll learn how to use on-chain data to make decisions with confidence. We’ll dig into how tools like Wallet Finder.ai uncover these hidden signals, helping you spot market shifts before they happen.
The token's wild history makes it a fascinating case study. After hitting an all-time high of $0.007232 on January 4, 2022, the price cratered, wiping out fortunes and highlighting the extreme risks in the altcoin space. You can explore the full history of SafeMoon V2 price movements on CoinMarketCap.
Understanding SafeMoon's past is essential to evaluating its present. This isn't ancient history—it's a roadmap of what can happen to your money.
SafeMoon V1 launched in March 2021 during the absolute peak of memecoin hysteria. Dogecoin was pumping. Everyone wanted the "next big thing." SafeMoon's pitch was genius: hold the token and earn passive income from other people's trades through the reflection mechanism.
The marketing blitz was everywhere. YouTube influencers (many paid) were screaming about 1000x gains. Twitter was flooded with #SafeMoonArmy posts. The community called themselves the "SafeMoon Army" and genuinely believed they'd all get rich together. The tokenomics seemed revolutionary—why wouldn't you hold a token that pays you just for holding?
Early buyers made life-changing money. If you bought $1,000 in the first week and sold at the peak, you walked away with $50,000-$100,000. Stories like this fueled even more FOMO buying.
But by May 2021, just two months after launch, problems emerged. The promised "SafeMoon Wallet" was delayed. The "SafeMoon Exchange" that was supposed to revolutionize crypto trading never materialized. Leadership drama exploded on social media with team members leaving and accusing each other of mismanagement.
Most damaging was the realization that the tokenomics favored early adopters at the expense of late buyers. The 10% tax meant that pumping the price required constant new money flowing in. Once the new buyer flow slowed, the price had nowhere to go but down.
In December 2021, the team announced SafeMoon V2 with a 1000:1 consolidation. Every 1,000 V1 tokens became 1 V2 token, and the price was adjusted 1000x higher to match. Your total dollar value stayed the same, but the optics improved.
Why the migration? The official reasons were to improve exchange listings (many require minimum price per token), reduce the massive supply numbers, and implement "improvements" to the smart contract. The real reason was likely to reset the narrative and try to attract fresh capital with a "new" token.
The migration itself was messy. Thousands of holders didn't migrate in time or didn't understand how. Some lost access to their tokens entirely. Others got caught in between chains with tokens stuck. The community fractured between those who successfully migrated and those who felt abandoned.
After V2 launched, there was a brief 2-3 month pump as the migration brought renewed attention. But by mid-2022, the downward trend resumed with a vengeance. Key milestones in the collapse:
January 2022: V2 hits all-time high of $0.007232 (up from migration price of ~$0.002). This is the last major peak.
March-June 2022: Entire crypto market crashes. Bitcoin drops 70%. SafeMoon drops 90%. The excuse was "market conditions."
July-December 2022: Failed promises pile up. The exchange never launches. The wallet has bugs. Volume dries up to under $1 million daily.
2023: The forgotten year. Price languishes under $0.0001. No development updates. Community shrinks from millions to thousands of active members.
2024: Occasional 20-50% pumps on random news, immediately sold back down. Classic dead-cat bounces.
2025-2026: Current state. Price under $0.000005. Down 99.95% from ATH. Volume under $100K most days. The "SafeMoon Army" is now mostly bagholders waiting for a miracle.
Let's be clear about the causes of death:
Cause #1: Unsustainable TokenomicsThe 10% tax requires exponential growth to maintain price. When new buyers stop coming, the math breaks. Early holders cash out their reflections, creating constant sell pressure. Late buyers can never catch up.
Cause #2: Failed PromisesThe exchange was supposed to launch in 2021. It's 2026 and it doesn't exist. The wallet has bugs years later. The NFT marketplace never happened. Each broken promise killed credibility.
Cause #3: Leadership FailuresTeam members left amid accusations of incompetence and worse. The original CEO stepped down. Legal issues emerged. Nobody trusted the team to execute.
Cause #4: Market ConditionsThe 2022 crypto crash killed momentum. But good projects recovered. SafeMoon didn't because it had no fundamental value to support recovery.
Cause #5: Whale ManipulationTop wallets held 30-40% of supply. They could (and did) manipulate price at will. When they sold, retail got destroyed. Trust evaporated.
SafeMoon's story teaches everything you need to know about memecoin speculation:
Lesson #1: Tokenomics That Sound Good Aren't Always GoodReflections seemed amazing until you realized they require constant new buying to have value.
Lesson #2: Community Hype Doesn't Equal FundamentalsMillions of holders and trending hashtags couldn't overcome the lack of real utility.
Lesson #3: Early Wins Create Late LosersFor every person who made 100x, there were 10 who lost 90% buying the top.
Lesson #4: Exit Strategy Beats Entry StrategyKnowing when to sell matters more than knowing when to buy. The holders who made money sold. The "diamond hands" lost everything.
Lesson #5: Promises Are WorthlessJudge projects on what they've delivered, not what they say they'll deliver.
If you want to get a real handle on the SafeMoon price v2, you can't just stare at the price chart all day. You have to go deeper—into the on-chain data. The token’s value is directly wired into its unique mechanics, which act like a built-in economic engine humming away on the blockchain.
Every single transaction leaves a footprint. Learning how to read these signals gives you a massive advantage over traders who only react to price wiggles.
Unlike your typical crypto asset, SFM's price is heavily shaped by three core functions: a transaction tax, automatic rewards for holders (known as reflections), and a continuous token burn. Together, these create a transparent ecosystem where you can see exactly what's happening. A sudden spike in the daily burn rate isn't just a random number; it's a flashing sign of rising trading volume, which often comes right before a big price move.
This diagram breaks down exactly how each transaction fuels the SafeMoon V2 ecosystem.
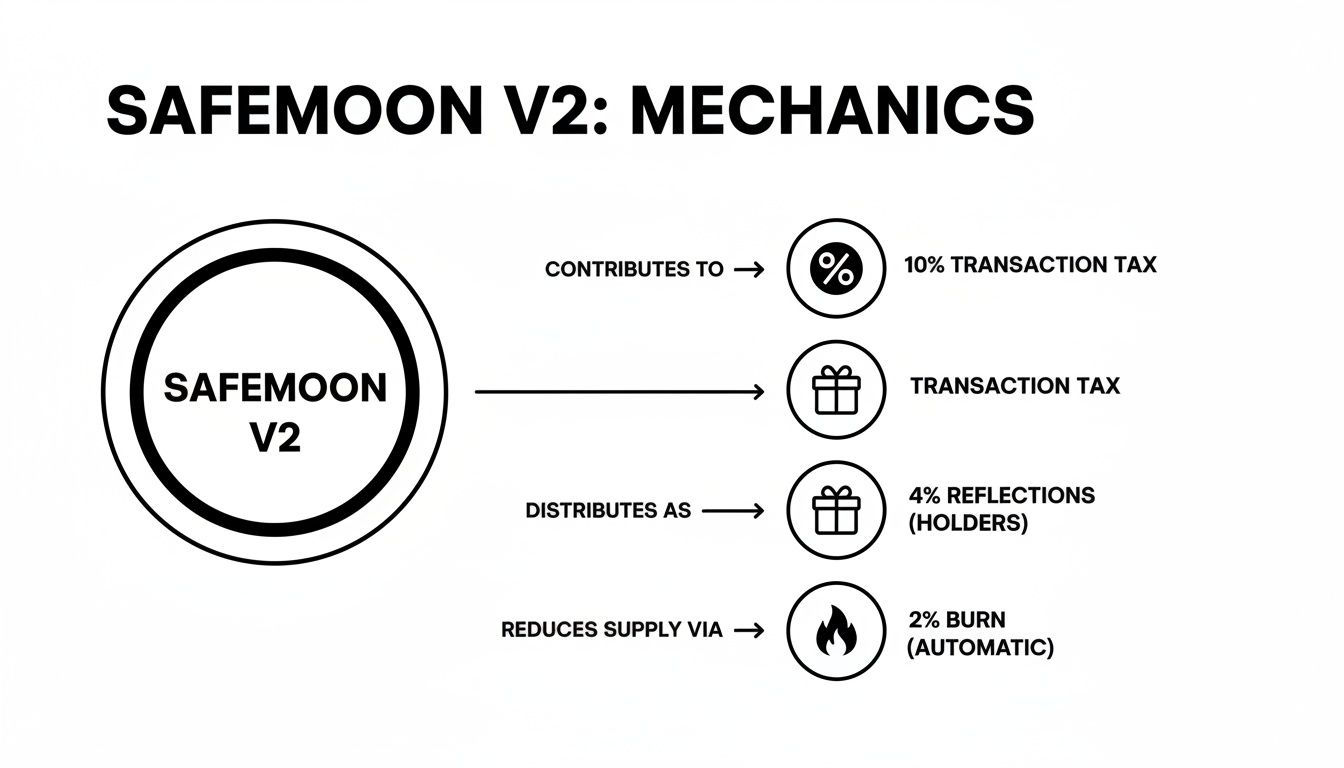
As you can see, that transaction tax is the engine driving everything, from rewarding holders to shrinking the total supply through the burn.
SFM’s tokenomics aren't just clever features; they're powerful market signals you can actually read. When you learn how to analyze them, they give you incredible insights into what holders are thinking and the overall health of the network. This shifts your approach from just reacting to price changes to actively anticipating them based on real, fundamental activity.
Here's an actionable checklist of the most important metrics to keep an eye on:
Let's break down these on-chain signals and how you can use them in a more structured way.
On-Chain MetricWhat It IndicatesActionable StrategyTransaction Volume & Burn RateHigher volume means more interest. A rising burn rate confirms this and shows supply is shrinking faster.Track daily burn rate on BscScan. A sustained increase over 3-5 days can signal a potential upward price trend.Reflection DistributionShows whether rewards are flowing to the masses or just a few top wallets. Wide distribution is a bullish sign.Check top holder charts on an explorer. If the top 10 wallets' percentage of supply is decreasing, it suggests decentralization and broader support.Liquidity Pool (LP) SizeThe amount of locked liquidity. A large, stable LP supports price stability and reduces slippage.Monitor the TVL of SFM's liquidity pool on a DEX tracker. A sudden, large withdrawal is a significant bearish signal.Whale Wallet MovementsLarge buys or sells from top wallets that can single-handedly move the market.Use a tool like Wallet Finder to set alerts for the top 20 SFM wallets. A large outflow to an exchange often precedes a sell-off.
Keeping an eye on these metrics is like having a live health report for the entire SFM ecosystem. This is the real foundation of data-driven trading in DeFi.
Some of the most predictable and dramatic price shifts are kicked off by whales—wallets holding enormous stacks of SFM. A single large buy or sell order from a whale can move the entire market. By tracking what these influential wallets are doing, you can spot potential price swings before they actually happen.
Whale activity gives you the context that charts alone can't provide. Is a major whale quietly accumulating more tokens? That could signal confidence in a future price increase. Are several large wallets suddenly moving their SFM to an exchange? That’s often a precursor to a big sell-off.
Watching these moves is like having an early warning system. It gives you precious time to position yourself ahead of the herd instead of getting swept away in the aftermath. If you're looking to really level up your strategy, our guide to crypto on-chain analysis breaks down exactly how to interpret these critical blockchain activities.
If you're determined to trade SafeMoon V2 despite the risks, here are the only strategies with any hope of working. Spoiler: they all require perfect timing and iron discipline.
SafeMoon occasionally pumps 30-100% in 24-48 hours on random news or manipulation. These pumps always crash back down within days. Your goal is to catch the bounce and exit fast.
Setup:Token has crashed 40-60% from a recent local high. Volume is dead (under $50K daily). Social media sentiment is extremely negative. Price has been flat for 5-7 days.
Entry signal:Sudden volume spike to $200K+ within an hour. Price up 15-20% on the spike. At least 2-3 whale wallets buying simultaneously (check BSCScan top holders).
Execution:Buy immediately when you see the spike. Don't wait for "confirmation"—by then it's too late. Use 12% slippage. Only risk 0.5% of your portfolio maximum.
Exit rules:Set sell orders at +30%, +50%, and +70% from your entry. Sell 33% of your position at each target if hit. If price reverses and drops 15% from your entry before hitting any target, sell everything immediately.
Time horizon: 4-48 hours maximum
Expected outcome: Win rate 40-50%. When you win, you win 30-70%. When you lose, you lose 10-25% (because you cut losses fast).
Why it sometimes works: Whales or pump groups occasionally manipulate SFM because of its low liquidity. You're trying to ride their wave and exit before they dump.
This strategy only makes sense if you believe SafeMoon will eventually recover OR if you're comfortable treating it as a lottery ticket that pays tiny dividends.
Setup:Buy during maximum fear—price has crashed 70-80% from recent high, sentiment is doom and gloom, volume is dead.
Position sizing:Invest an amount you can mentally write off as $0 immediately. If losing this money would bother you at all, don't do this strategy. Recommended: 0.25-0.5% of total portfolio.
Execution:Make a single purchase during the fear phase. Set 12% slippage. Transfer tokens to a hardware wallet or cold storage.
The hold:Do absolutely nothing for 6-12 months minimum. You're collecting reflection rewards passively. Check price quarterly at most.
Exit conditions:Sell everything if price 3x-5x from your entry (rare but possible during pumps). Sell everything if fundamentals worsen (team abandons project, liquidity drained, etc.). Otherwise, hold indefinitely or write it off as a total loss.
Expected outcome: 80% chance of total loss or 50-80% loss. 15% chance of breaking even. 5% chance of 2-5x return if you catch a major pump.
Why you might try this: If SafeMoon is 0.5% of your portfolio and it goes to zero, you lost 0.5%. If it somehow 5x, you made 2% portfolio return. Asymmetric bet for gamblers.
SafeMoon recently announced plans to migrate to Solana. If this actually happens (big if), there could be short-term opportunities.
The setup:Team announces concrete migration date and mechanism. BSC version still exists but Solana version launches.
The opportunity:Price disparities between chains create arbitrage. BSC version might trade at $0.000005 while Solana version trades at $0.000006 due to hype. Or vice versa.
Execution:Buy the cheaper version, migrate tokens to the expensive chain, sell immediately for profit minus gas fees.
Risks:Migration might have delays, bugs, or fail entirely. You could get stuck with unmigrated tokens. Gas fees on Solana are low but swaps cost money.
Expected outcome: Highly speculative. Could make 10-30% on small position if arbitrage exists. Could lose everything if migration fails.
Current status: As of early 2026, Solana migration is announced but not executed. Watch official channels before attempting.
This requires real-time whale tracking and fast execution.
Setup:Identify the top 10 SFM whale wallets on BSCScan. Track them using WalletFinder.ai or manual monitoring.
Entry signal:2 or more whales buy $10K+ worth within a 6-hour window. This suggests coordinated accumulation before a planned pump.
Execution:Buy within 12 hours of seeing whale accumulation. Use 0.5-1% position size maximum.
Exit rules:When those same whales transfer tokens to PancakeSwap or exchange deposit addresses, sell immediately. They're preparing to dump.
Time horizon: 3-14 days typically
Expected outcome: 50-60% win rate if you execute perfectly. Wins are 30-80%. Losses are 20-30%.
Why it works: Whales pump their own bags then dump on retail. You're trying to follow the pump and exit before the dump.
Regardless of which strategy you attempt:
Rule #1: Position SizingNever exceed 2% of your total portfolio in SafeMoon combined across all positions. Preferably stay under 1%.
Rule #2: Stop LossesAlways set stop-losses before entering. For SafeMoon, 25-30% max loss is appropriate. When hit, sell immediately without hesitation.
Rule #3: Profit TakingTake profits aggressively. Sell portions at 30%, 50%, 100% gains. Don't wait for 10x. It won't come.
Rule #4: Don't Average DownIf your position drops 25%, don't buy more to "lower your average." Cut the loss and move on.
Rule #5: Ignore Social MediaThe SafeMoon community will tell you to "HODL" and promise moon missions. Ignore them. They're bagholders hoping you buy so they can exit.
Rule #6: Track On-Chain, Not SentimentBase decisions on whale movements, volume, and liquidity—not Twitter hype or Reddit posts.
If on-chain data is your long-range weather forecast for the SafeMoon V2 ecosystem, then price charts are your real-time GPS. They give you the tactical view, helping you navigate the market’s current mood swings. When you combine the two, you get a powerful, layered perspective on the safemoon price v2 that most people miss.
For an asset as volatile as SFM, throwing a bunch of standard indicators at the chart can spit out a lot of false signals. It's just noise. But a couple of them work surprisingly well if you know what you’re looking for. The trick is to never trust just one indicator; always look for confirmation between your chart and the on-chain signals we've already covered.
The Relative Strength Index (RSI) is a classic for a reason. It’s a momentum indicator that tells you how fast and how hard the price is moving, scored on a simple scale from 0 to 100. For SFM, it's brilliant at spotting when the market is getting a little too greedy or a little too scared.
Here’s a quick-reference guide for reading it:
RSI ReadingMarket ConditionPotential ActionAbove 70OverboughtThe asset may be overvalued. Consider taking profits or setting a stop-loss.Below 30OversoldThe asset may be undervalued. This could be a potential buying opportunity.DivergencePrice and RSI move in opposite directionsA powerful signal. Bearish divergence (higher price, lower RSI) warns of a potential top. Bullish divergence (lower price, higher RSI) suggests a potential bottom.
The most powerful RSI signal for the SafeMoon price v2 is divergence. If the price chart shows a new high but the RSI chart shows a lower high, that’s a bearish divergence. It's a huge red flag that the upward momentum is fading. On the flip side, if the price hits a new low but the RSI makes a higher low, that’s a bullish divergence—a strong hint that a bottom might be forming.
Next up are Bollinger Bands, which are perfect for visualizing SFM's legendary volatility. You have three lines: a middle line (just a simple moving average) and two outer bands that expand and contract based on how wild the price action is.
When looking at the SFM price, keep an eye out for these two patterns:
The real power comes from layering these tools. Imagine the RSI is showing SFM is oversold (below 30) at the exact same time the price touches the lower Bollinger Band. That’s a much stronger signal for a potential buy than either indicator would be on its own.
Now, cross-reference that with on-chain data, like seeing the burn rate suddenly pick up. You're no longer just guessing; you're building an evidence-based strategy.
Dipping your toes into decentralized exchanges (DEXs) like PancakeSwap to grab some SafeMoon V2 can be exciting, but you need to go in with a security-first mindset. Unlike the big centralized exchanges, on a DEX, you're the one in control—which also means you're your own head of security. Getting this right is everything if you want to protect your funds from common scams and technical headaches.
First, here's a step-by-step checklist to prepare:
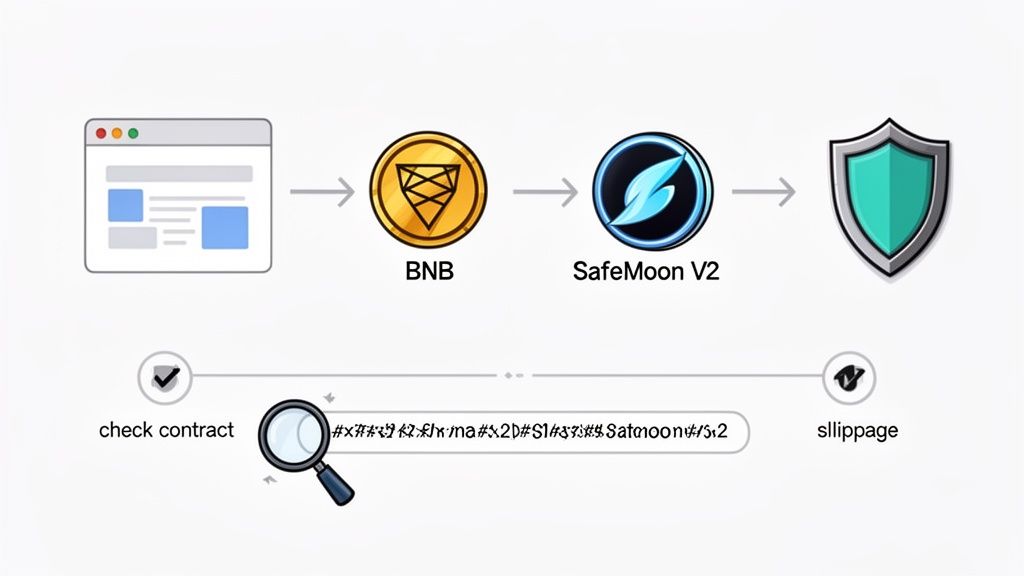
With your wallet funded, it's time to connect to a DEX like PancakeSwap. This next part is where the most critical security check happens. Don't skip it.
Here’s the single most important step before you swap for SFM: verify you are using the correct smart contract address. This is non-negotiable. Scammers are notorious for creating counterfeit tokens with the same name and logo to fool investors. If you interact with the wrong contract, your funds are gone. Poof.
To stay safe, only get the official SFM contract address from a trusted source like CoinMarketCap or the official SafeMoon website. Never, ever trust an address someone sends you on social media or in a random chat group.
Once you have the legit address, paste it into the token import field on PancakeSwap. This move guarantees you're trading the real SafeMoon V2 token. For a deeper dive into moving assets across different blockchains securely, check out our guide on how to chain swap crypto.
Okay, you've got the right token selected. Now you need to adjust your slippage tolerance. Slippage is just the potential price wiggle that can happen between the moment you hit "swap" and when the transaction is actually confirmed on the blockchain. Because SFM has that built-in 10% transaction tax, your slippage has to be set high enough to cover it.
A typical slippage of 1-2% will just cause your transaction to fail. For SFM, you need to crank it up to 12% or even a bit higher.
This covers two things:
Nailing the slippage is essential for a successful swap. If you set it too low, the transaction will fail, but you'll still lose the gas fees you paid. By following these two simple steps—verifying the contract and setting the right slippage—you can buy SafeMoon V2 confidently and safely.
Technical indicators and on-chain metrics give you a powerful view into the market, but the pros add another layer to their strategy: they track smart money. This means finding and watching the wallets of highly profitable traders who consistently beat the market. When you see what they're doing, you get early clues about potential shifts in the safemoon price v2 long before they show up on the charts.
This entire strategy flips trading from reactive to proactive. Instead of just reacting to price candles, you start anticipating them by watching what the most successful players are doing right now. It’s like getting a peek at the playbook of the market's top performers.
First thing's first: you have to find these "winning" wallets. Trying to manually sift through thousands of transactions on a block explorer is a surefire way to get lost. This is where specialized tools like Wallet Finder.ai are a game-changer, letting you filter for wallets based on their actual performance.
You can zero in on traders who have a proven track record with SFM by looking for a few key traits:
The screenshot below from Wallet Finder.ai shows how you can easily filter wallets to find those with the highest gains, giving you a ready-made list of top performers to dig into.
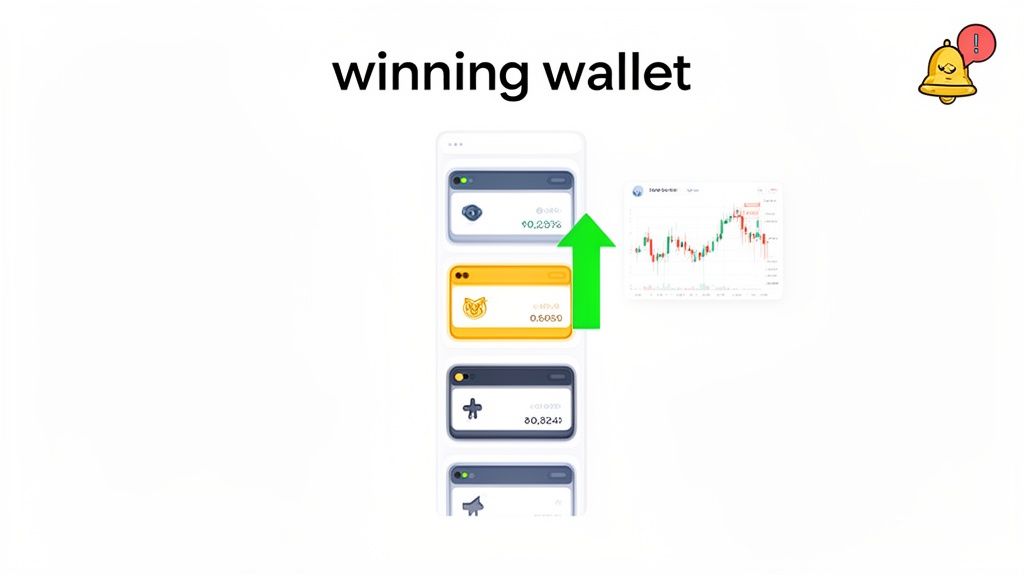
This data-first approach helps you cut through the noise and focus only on the wallets whose actions have historically come before major price moves.
Once you've got a handful of interesting wallets, the real fun begins. Dive into their transaction history to figure out how they trade. Are they accumulating SFM slowly over time, or do they make huge, decisive buys right before a pump? Do they dump everything at once or take profits in stages on the way up?
By studying their entry and exit points, you start to see patterns. These patterns are pure gold because they can reveal sophisticated strategies that are completely invisible if you're only looking at charts.
The final, and most powerful, step is to set up real-time alerts. Modern wallet-tracking tools can send you an instant notification the moment a wallet you’re watching makes a move.
Actionable Alert Setup:
This method gives you a powerful leading indicator. For instance, when you see three or four of your top-watched wallets all start buying SFM within a few hours of each other, that's a very strong signal that they expect the price to go up.
To get a better handle on this advanced technique, check out our deep dive into how wallet accumulation predicts token price moves.
The statistics are brutal: an estimated 90-95% of people who bought SafeMoon V2 have lost money. Here's exactly why, and what the 5-10% who profited did differently.
The overwhelming majority of SafeMoon buyers purchased during pumps when everyone was talking about it. They saw the price skyrocketing, read about people making 100x returns, and FOMO'd in near the top.
What actually happens:Pumps are created by whales and early buyers selling to late retail. When you buy during a pump, you're exit liquidity. The price peaks within hours or days of your purchase, then crashes 50-70%.
What winners did differently:They bought during maximum fear when the price had crashed and nobody was talking about it. They accumulated slowly at the bottom, not all at once at the top.
Most losing traders held through 50%, 70%, 90% losses thinking "it has to come back eventually." It didn't.
The psychology:After losing 50%, you tell yourself "I'm already down half, might as well hold and see if it recovers." After 70%, it's "I've lost this much, what's the point of selling now?" You hold all the way to -95% out of stubbornness and false hope.
What winners did differently:They set stop-losses at 20-30% maximum before entering. When hit, they sold immediately and preserved 70-80% of their capital. They could then redeploy that capital into the next opportunity.
Traders calculated that if they held 100 million SFM, they'd earn X dollars per day in reflections. They convinced themselves this was "passive income" and held through price crashes to keep collecting rewards.
The math that destroys you:Earning $5/day in reflections is worthless if your position loses $50/day in value from price decline. You're collecting pennies while dollars burn.
Example:$10,000 position earning $200/month in reflections during peak volume. Sounds great! But in 6 months, the price drops 80% and your position is worth $2,000. You earned $1,200 in reflections but lost $8,000 in value. Net result: -$6,800.
What winners did differently:They recognized reflections as a bonus, not the reason to hold. They sold when price peaked, collected their capital gains, and stopped worrying about missing $5 in reflections.
Countless traders held because the team promised an exchange, enhanced wallet features, NFT marketplace, and other developments that never materialized or launched broken.
The trap:"I'll hold until the exchange launches, then this will moon!" The exchange never launches. "I'll hold until the wallet is fixed." The wallet stays buggy. Promises keep you holding while price crashes.
What winners did differently:They judged the project on current reality, not future promises. They sold based on current price action, not hoped-for developments.
Some traders put 10%, 20%, even 50% of their portfolio into SafeMoon thinking it was their ticket to wealth. When it crashed 95%, it destroyed their entire portfolio.
The devastation:If SafeMoon is 50% of your portfolio and it drops 90%, you've lost 45% of your total wealth. You'd need a 80%+ gain on your remaining capital just to break even. That's nearly impossible.
What winners did differently:They risked 1-5% maximum. If it went to zero, they lost 1-5% of their portfolio—painful but survivable. If it 5x'd, they made 5-25% portfolio return. Smart risk management.
Traders saw a token price of $0.002 and assumed they could sell their $10,000 position at that price. They couldn't. With only $50K in daily volume, their sell order caused 30-40% slippage.
What actually happens:You own $10,000 worth at $0.002 per token. You try to sell. The sell moves the price from $0.002 to $0.0012 due to low liquidity. You receive $6,000-$7,000 instead of $10,000.
What winners did differently:They checked volume before buying. They only bought when daily volume was at least 10x their intended position size. A $1,000 position requires minimum $10K daily volume to exit cleanly.
The SafeMoon community aggressively shamed anyone who sold as "paper hands" and praised "diamond hands" holders. Social pressure kept people holding through catastrophic losses.
The result:Diamond hands holders are now sitting on 95-99% losses. The "paper hands" who sold at 50% loss at least preserved half their capital.
What winners did differently:They ignored social media pressure entirely. They sold when their price targets hit or stop-losses triggered, regardless of what the community said.
The 5-10% who made money on SafeMoon shared these traits:
They treated it as a gamble, not an investment. Position sizes were tiny. Expectations were low.
They had exit plans before entry. They knew their profit targets and stop-losses before buying a single token.
They took profits aggressively. When up 50-100%, they sold at least half. They didn't get greedy waiting for 1000x.
They ignored hype. Bought when others were scared, sold when others were greedy.
They tracked smart money. Watched whale wallets, not Twitter sentiment.
They accepted losses quickly. Hit stop-loss, sold, moved on. No emotional attachment.
They never averaged down. Position went against them, they cut it. They didn't throw good money after bad.
Even with a solid game plan, SFM's unique mechanics can trip up even experienced traders. Let's clear up a few of the most common points of confusion. Getting these answers straight is key to building the confidence you need to trade effectively.
Think of this as reinforcing what we've already covered, making sure you have the complete picture before you make your next move.
Anyone looking at a historical SafeMoon chart for the first time gets a shock. You see this massive, vertical price jump between V1 and V2 and assume something incredible happened. But that wasn't a market rally; it was a planned token consolidation.
During the migration from V1 to V2, the developers initiated a 1000:1 consolidation. What that means is for every 1,000 old V1 tokens you held, you received just 1 new V2 token.
Of course, to make sure nobody lost money in the process, the price of each V2 token was simultaneously made 1,000 times higher.
For example, if you were holding 10 million V1 tokens that were worth $100, the swap would have left you with 10,000 V2 tokens, also worth exactly $100. Your bag's total value didn't change an inch at the moment of migration.
So, why do it? The team's stated reasons for this structural change were to:
The key thing to remember is this was a structural change, not a sudden, organic price explosion.
The 10% transaction tax is the heart of the entire SafeMoon ecosystem, and it touches every single thing you do with your SFM. Buying, selling, or even just moving tokens from one of your wallets to another—it all gets hit with the tax, deducted right from the transaction total.
This tax is what powers SafeMoon's tokenomics. It's not just a fee; it's the fuel that gets split up to run the whole machine:
For a trader, the bottom line is this: you're starting every trade 10% in the hole. When you go to swap on a DEX like PancakeSwap, you have to account for this. You'll need to set your slippage tolerance to at least 12% to make sure the transaction goes through. That covers the 10% tax and gives you a 2% cushion for any price swings that happen while your trade is confirming on the blockchain.
No, it is no longer possible to swap SafeMoon V1 tokens for V2. The official migration window established by the development team has been closed for a long time.
There was a specific process and a generous timeframe for holders to make the switch. Once that window closed, the V1 smart contract was effectively shut down and its liquidity was removed.
Any V1 tokens that were not swapped are now, for all practical purposes, without value in the SafeMoon ecosystem. They cannot be officially converted to SFM V2. Be extremely wary of anyone—or any third-party website—claiming they can still perform the swap for you. These are scams, 100% of the time, designed to drain your wallet. The V1 token is defunct; there is no legitimate way to exchange it.
Ready to stop guessing and start tracking the smart money in DeFi? Wallet Finder.ai gives you the tools to discover profitable wallets, analyze their strategies, and get real-time alerts on their trades. Find your edge and trade with confidence. Start your 7-day trial at Wallet Finder.ai.

A premier DeFi analytics platform empowering traders to discover and analyze profitable blockchain wallets, trades and tokens.

