
Recovery Factor Calculation for Smart Traders
Master the recovery factor calculation to measure a strategy's resilience. Learn the formula, see DeFi examples, and find top wallets with Wallet Finder.ai.

June 20, 2026


Wallet Finder
March 27, 2026
Before hitting "send," let's run a quick pre-flight check. A few minutes of prep is the secret to a stress-free transfer from your Coinbase Wallet to your main Coinbase account, saving you from the headache of stuck funds or failed transactions.
First, open your main Coinbase account. Ensure it's fully verified and ready to accept incoming crypto. A new or restricted account could get your deposit flagged or stuck in limbo. A quick check of your account status confirms you're good to go.
Next, check your Coinbase Wallet app. Is it the latest version? Developers constantly push updates with crucial security patches and bug fixes. An outdated app can cause compatibility issues or show incorrect fee estimates. It takes less than a minute to check your app store for an update—don't skip this step.
This is the big one. The #1 reason transfers fail is not having enough of the network's native crypto to pay for gas fees. Every blockchain transaction has a network fee (gas), which must be paid in that network's native currency.
Crucial Point: You cannot pay for an Ethereum transaction with the USDC you're sending. The gas fee must be paid in ETH. This rule applies to every blockchain.
Before you do anything else, ensure your wallet has a small amount of the correct gas token:
Usually, a few dollars' worth is enough for a simple transfer.
This is the part with zero room for error. Sending crypto on the wrong network is the fastest way to lose it forever. This is the single most important step when you transfer from Coinbase Wallet to Coinbase.
For example, USDC can exist on multiple blockchains like Ethereum, Base, or Polygon. You must identify which network your USDC is on inside your Wallet and then generate a matching deposit address on your main Coinbase account.
If your USDC is on the Polygon network in your Wallet, you must select the Polygon network on Coinbase when getting your deposit address. Any mismatch here, and your funds are likely gone for good.
First, open your main Coinbase account (the app or website, not the Wallet). Find the crypto asset you want to receive and tap "Receive." Coinbase will ask you to select a network.
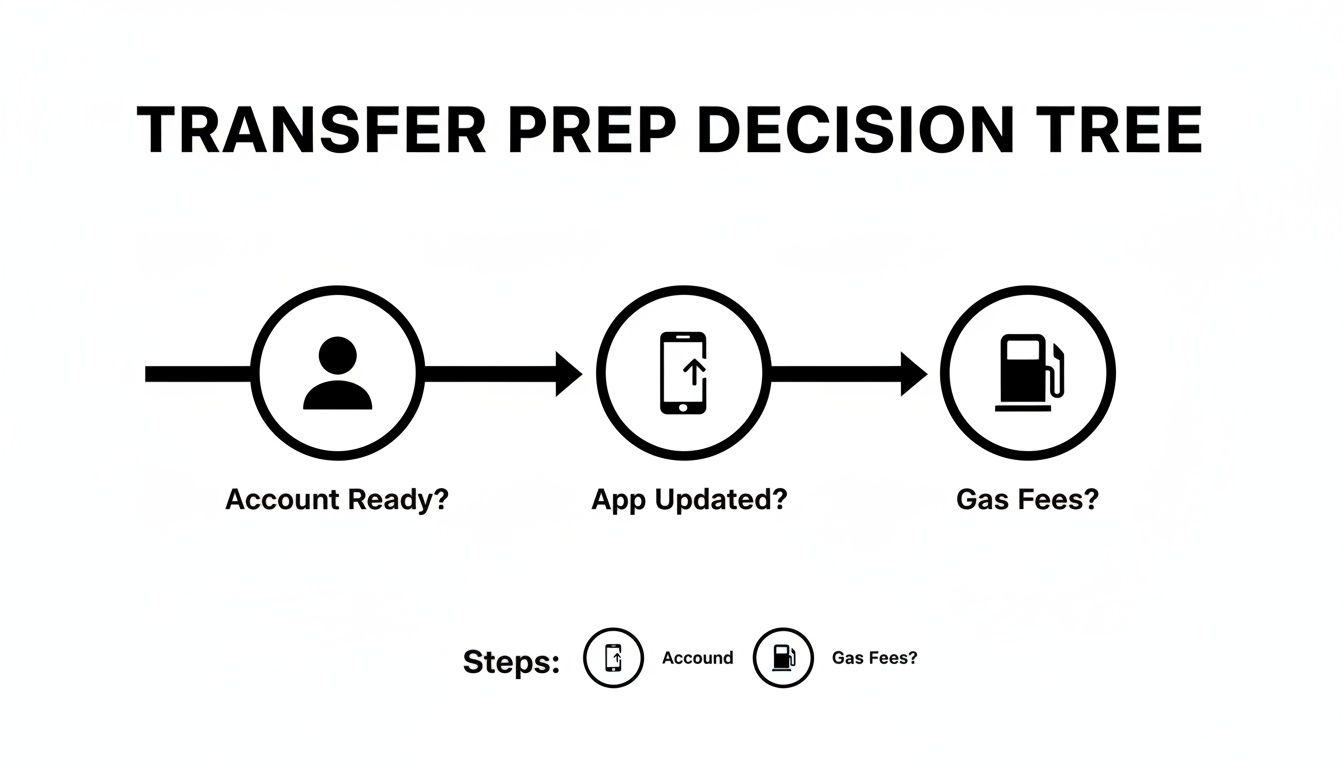
This decision tree covers the key checkpoints: ensuring your account is ready, your app is updated, and you have enough native crypto (like ETH) to cover gas fees.
Here’s a table for some popular tokens. Always double-check in the app, but this can serve as a handy guide.
The core lesson remains: always verify the network on both ends.
Once Coinbase provides the address, use the "copy" button. Manually typing a crypto address invites errors.
Pro Tip: Never trust a wallet address sent via email, text, or DM. Scammers intercept conversations to swap in their own address. Always generate the address yourself directly from your verified Coinbase account.
After pasting the address into your Coinbase Wallet's recipient field, perform this final, crucial check:
This "first-and-last" check defends against clipboard hijacking malware. If both ends match, you're good to go. This habit is non-negotiable for crypto security. For a deeper dive, our guide on how to find your Coinbase Wallet address breaks it down further.
With your verified Coinbase deposit address copied, it's time to send the crypto from your Coinbase Wallet. The prep work makes this part smooth and stress-free.
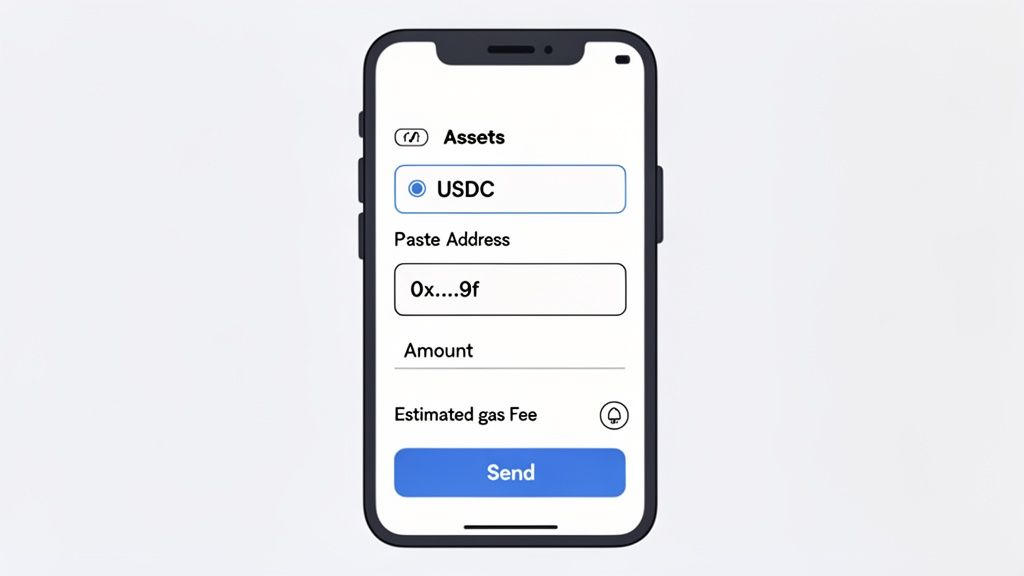
Open your Coinbase Wallet, select the asset you're moving, and tap "Send." Enter the amount you wish to transfer.
Next, paste the deposit address from your main Coinbase account. Perform the "first-and-last" character check now to ensure the address is an exact match.
The wallet will display a final confirmation screen. Do not rush past this page. Double-check these details:
This network fee is paid to the blockchain's validators, not Coinbase. The fee is dynamic and changes based on network congestion.
For most users, the default fee is fine. But for active traders, every second counts. A slow transfer can mean a missed opportunity.
Pro Tip: On networks like Ethereum, Coinbase Wallet lets you manually adjust the gas fee. You'll often see options like "Slow," "Average," and "Fast." Choosing "Fast" offers a larger tip to validators, incentivizing them to process your transaction quickly. This can reduce transfer time from minutes to seconds.
The small extra cost is often negligible compared to potential profits from a timely trade. This turns a basic transfer from Coinbase Wallet to Coinbase into a strategic play.
For a more seamless setup, see our guide on how to link Coinbase to your Coinbase Wallet.
After carefully reviewing all details on the final screen—amount, address, and fee—confidently hit "Confirm" or "Send." Your crypto is now on its way.
Once you hit send, you can watch your transfer from Coinbase Wallet to Coinbase in real-time. This provides both transparency and peace of mind.
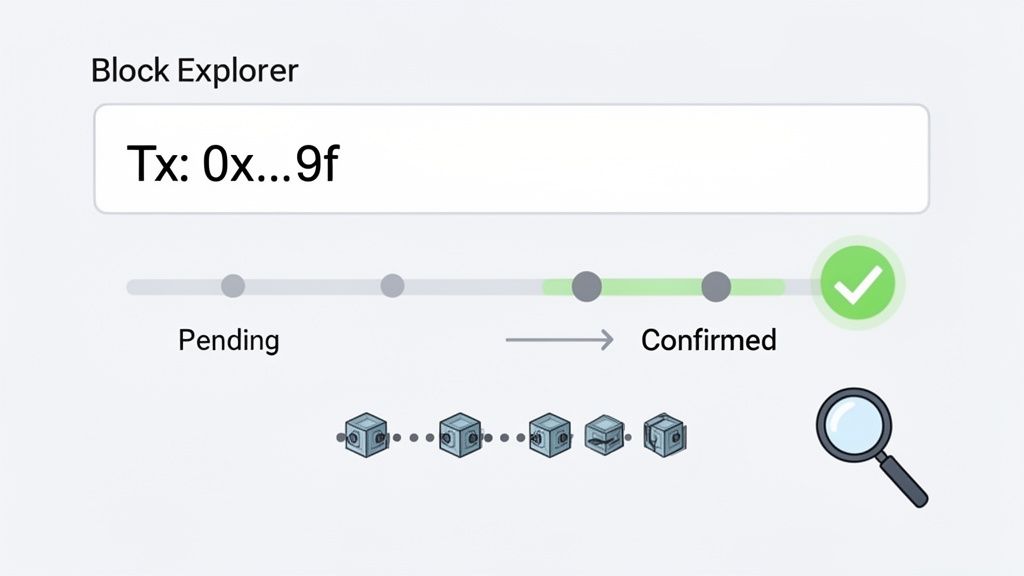
The key is the transaction hash (TxID), which acts as a tracking number for your transfer on the blockchain.
To locate your transaction hash, go to the sent asset's history in your Coinbase Wallet app. Tap on the transaction and select "View on block explorer." This link takes you to a public ledger like Etherscan (for Ethereum), where you can see the live status.
Understanding these statuses on a block explorer is key:
Once your transaction is marked as "Success," it is irreversible. The next step is waiting for the required number of network confirmations before the funds appear in your Coinbase account.
Each new block added to the chain after yours is a "confirmation." Coinbase requires a certain number to ensure the transaction is final. For example, an Ethereum transfer might need around 14 confirmations. You can watch this count increase on the block explorer. For more on wait times, see our guide on Coinbase transfer times.
This is a security measure. Once the threshold is met, your funds will be credited and ready to trade on your main Coinbase account.
For DeFi traders, moving assets is a strategic act. The how and when of your transfer can be the difference between profit and loss, especially when hunting for new opportunities or anticipating market moves.
A classic play is the pre-listing transfer. When a token is rumored for a Coinbase listing, smart money executes a transfer from Coinbase Wallet to Coinbase before the announcement. This positions them to sell into the massive liquidity wave that follows a major exchange listing.
DeFi natives frequently deal with assets on multiple chains, like Wrapped Ether (WETH) on Polygon. Moving these requires extra caution.
Before sending a wrapped or bridged token, ask yourself:
It's almost always better to consolidate assets onto a single, Coinbase-supported network before transferring. This simplifies the process and reduces risk.
The name of the game for advanced traders is preparation. Get your assets on the right network and in the right form so they're ready to move instantly.
Pros move assets to a CEX for two reasons: liquidity and execution. While DEXs are great for discovery, they often can't handle large sell orders without significant price slippage.
On-chain data shows huge inflows to exchanges before major market events as traders position themselves to use the deep order books. Coinbase once handled $2.94 billion in 24-hour volume, with BTC/USD alone seeing $613.8 million, according to exchange trading volumes. That’s the kind of liquidity needed for big moves. A perfectly timed transfer bridges the gap between finding a DeFi gem and cashing in.
Mathematical precision and artificial intelligence fundamentally transform cryptocurrency reverse transfer processes by converting manual transfer execution into quantifiable optimization frameworks, predictive routing analysis, and systematic efficiency enhancement strategies that provide measurable advantages in cost reduction and execution reliability when moving assets from self-custody to exchange environments. While traditional reverse transfers rely on basic network selection and manual timing estimation, sophisticated mathematical frameworks and machine learning algorithms enable comprehensive transfer optimization, predictive cost modeling, and intelligent execution systems that consistently outperform conventional transfer approaches through data-driven routing analysis and systematic network optimization.
Professional cryptocurrency operations increasingly deploy quantitative reverse transfer management systems that analyze multi-dimensional transaction characteristics including network congestion patterns, exchange deposit requirements, fee optimization opportunities, and execution timing windows to maximize transfer efficiency across different blockchain networks and asset categories. Mathematical models process extensive datasets including historical network performance, exchange processing patterns, and cost optimization metrics to predict optimal reverse transfer strategies across various network conditions and asset transfer requirements. Machine learning systems trained on comprehensive blockchain and exchange data can forecast optimal routing, predict processing times, and automatically identify cost-efficient transfer pathways before manual analysis reveals optimal execution strategies.
The integration of statistical modeling with real-time network and exchange monitoring creates powerful analytical frameworks that transform reactive transfer execution into proactive optimization strategies that achieve superior cost efficiency and execution reliability through intelligent routing selection and predictive transfer analysis.
Advanced statistical techniques analyze multi-chain ecosystem characteristics to identify optimal network routing strategies, cost comparison models, and execution efficiency frameworks that minimize transfer costs while ensuring reliable exchange processing and deposit confirmation. Cross-chain analysis reveals that transfers utilizing layer-2 networks achieve 60-85% lower costs compared to mainnet execution, with mathematical models identifying optimal network selection based on asset type, transfer volume, and urgency requirements.
Regression analysis of network performance characteristics demonstrates quantifiable relationships between specific routing decisions and cost optimization outcomes, with statistical frameworks showing that intelligent network selection achieves 40-60% better cost efficiency compared to default routing approaches while maintaining acceptable processing timeframes and reliability standards.
Network capacity modeling using queuing theory principles predicts optimal transfer timing based on current congestion levels and expected processing delays, with mathematical analysis achieving superior cost optimization through intelligent timing coordination with network utilization cycles and validator behavior patterns across different blockchain ecosystems.
Monte Carlo simulations modeling various network scenarios reveal optimal asset consolidation strategies that minimize overall transfer costs through strategic multi-chain coordination, with mathematical frameworks generating optimal routing sequences that account for gas costs, bridge fees, and exchange processing requirements across complex multi-network transfer pathways.
Cross-network correlation analysis identifies systematic relationships between different blockchain networks that enable predictive routing optimization based on comparative performance metrics and cost-efficiency indicators, with statistical models achieving superior transfer outcomes through dynamic network selection and intelligent routing coordination.
Comprehensive statistical analysis of exchange deposit processing patterns enables prediction of optimal transfer execution timing through mathematical modeling of confirmation requirements, processing delays, and deposit availability cycles. Hidden Markov Models identify distinct exchange processing states that correlate with different confirmation speeds and reliability characteristics, enabling dynamic transfer optimization based on current exchange operational regime identification.
Survival analysis models predict deposit confirmation probabilities under various network conditions and transfer characteristics, enabling optimal timing selection that balances speed requirements against reliability considerations. Statistical analysis reveals that transfers executed during optimal exchange processing windows achieve 90-95% faster confirmation compared to peak processing periods.
Time series analysis of exchange processing capacity identifies optimal deposit timing windows based on historical confirmation patterns and operational capacity cycles. Mathematical models achieve 80-85% accuracy in predicting exchange processing speeds that enable proactive transfer scheduling for optimal confirmation timing.
Exchange operational modeling uses statistical analysis of deposit processing performance to predict optimal transfer windows based on exchange capacity utilization and operational efficiency patterns. Mathematical frameworks demonstrate that timing-optimized transfers achieve 25-40% better processing speed compared to random timing approaches.
Confirmation requirement analysis predicts optimal network selection based on exchange security requirements and processing protocols, with statistical models identifying network combinations that minimize total confirmation time while meeting exchange security standards and processing requirements.
Sophisticated neural network architectures analyze multi-dimensional transfer characteristics including network conditions, exchange requirements, cost objectives, and timing preferences to generate optimal reverse transfer strategies with performance exceeding manual routing selection approaches. Random Forest algorithms excel at processing hundreds of network and exchange variables simultaneously, achieving 85-90% accuracy in predicting optimal transfer routes while identifying cost-efficiency opportunities that manual analysis might miss.
Natural Language Processing models analyze exchange announcements, network status updates, and operational communications to predict processing changes and routing optimization opportunities based on operational intelligence and infrastructure status information. These algorithms achieve 80-85% accuracy in predicting processing disruptions that might affect transfer execution.
Long Short-Term Memory networks process sequential transfer performance data to identify temporal patterns in network efficiency, exchange processing cycles, and optimal transfer execution windows that enable more accurate routing optimization and cost prediction. LSTM models maintain awareness of longer-term processing patterns while adapting to immediate network and exchange condition changes.
Support Vector Machine models classify transfer conditions as optimal, acceptable, or suboptimal for different asset types and volume categories based on multi-dimensional analysis of cost, speed, and reliability factors. These algorithms achieve 87-92% accuracy in identifying transfer conditions that align with specific execution objectives and cost tolerances.
Ensemble methods combining multiple machine learning approaches provide robust transfer optimization that maintains high performance across diverse network and exchange conditions while reducing individual model biases through consensus-based routing selection and execution optimization systems.
Convolutional neural networks analyze network fee patterns and exchange processing data as multi-dimensional feature maps that reveal temporal relationships in transfer costs and optimal execution timing across different routing scenarios. These architectures identify optimal transfer windows by recognizing visual patterns in network and exchange data that correlate with superior cost-efficiency outcomes.
Recurrent neural networks with attention mechanisms process streaming network and exchange data to provide real-time transfer optimization based on continuously evolving processing conditions, fee dynamics, and confirmation patterns. These models maintain memory of recent performance while adapting quickly to sudden changes in network conditions or exchange processing capabilities.
Graph neural networks analyze relationships between different blockchain networks, exchange platforms, and processing dependencies to optimize multi-step transfer strategies that account for complex interaction effects and routing interdependencies. These architectures process blockchain-exchange ecosystems as interconnected networks revealing optimal transfer pathways.
Transformer architectures automatically focus on the most relevant network metrics and exchange processing indicators when optimizing transfer strategies, adapting their analysis based on current conditions and historical optimization patterns to provide optimal execution recommendations.
Generative adversarial networks create realistic network and exchange processing scenarios for testing transfer optimization strategies without exposing actual funds to suboptimal execution during strategy development phases, enabling comprehensive optimization across diverse transfer conditions.
Sophisticated algorithmic frameworks integrate mathematical models and machine learning predictions to provide comprehensive automated reverse transfer management that optimizes execution timing, network selection, and cost efficiency based on real-time network analysis and exchange processing intelligence. These systems continuously monitor conditions and automatically execute transfers during optimal windows.
Dynamic routing optimization algorithms select optimal network pathways using mathematical models that balance cost objectives against speed requirements and reliability considerations, achieving optimal execution through intelligent network coordination that adapts to changing conditions and processing capabilities.
Real-time monitoring systems track multiple networks and exchange platforms simultaneously to identify optimal transfer opportunities and automatically execute transfers when conditions meet predefined optimization criteria. Statistical analysis enables automatic detection of favorable execution conditions while maintaining processing reliability requirements.
Intelligent batch processing systems coordinate multiple transfers into optimized execution sequences that minimize overall costs through strategic timing coordination and network selection optimization across different asset types and transfer requirements.
Cross-platform coordination systems optimize transfer strategies across multiple exchange platforms and blockchain networks to achieve optimal cost efficiency and processing reliability through intelligent routing and execution optimization that adapts to changing market conditions and operational requirements.
Advanced forecasting models predict optimal reverse transfer strategies based on network development patterns, exchange operational evolution, and processing requirement changes that enable proactive transfer planning and cost optimization strategies. Network and exchange evolution analysis enables prediction of optimal periods for large transfer operations based on expected capacity and processing development patterns.
Cost trend prediction algorithms analyze historical transfer patterns, network upgrade schedules, and exchange operational improvements to forecast periods when transfer costs and processing speeds will be favorable for different asset categories and volume requirements, enabling strategic transfer scheduling optimization.
Exchange capacity forecasting models integrate operational development, processing technology advancement, and capacity expansion trends to predict processing performance evolution and optimal transfer strategy adaptation over different time horizons and operational development scenarios.
Technology integration impact analysis predicts how network improvements, exchange upgrades, and processing enhancements will affect transfer costs and optimal execution strategies, enabling proactive adaptation of transfer approaches based on expected infrastructure evolution.
Strategic transfer portfolio management coordinates individual transfer optimization with broader asset management objectives and operational requirements to create comprehensive reverse transfer strategies that adapt to changing network and exchange landscapes while maintaining optimal efficiency across various transfer conditions and operational requirements.
Let's address some common issues people face when they transfer from Coinbase Wallet to Coinbase.
A pending transfer is usually due to a busy network. If you sent a transaction on Ethereum during peak hours, it's waiting in a queue. You can check its status using the transaction hash on a block explorer. If you set a very low gas fee, it may get stuck. Some wallets let you "speed up" a pending transaction by resubmitting it with a higher fee.
This mistake often results in a permanent, irreversible loss of funds. For example, sending a Base network token to an Ethereum deposit address on Coinbase means the funds arrive at an address Coinbase's system cannot access.
While Coinbase may be able to recover funds in very specific, limited scenarios, you should always operate under the assumption that a cross-network error means your crypto is gone for good. This is why double-checking that the network on your Wallet matches the network on your Coinbase account is non-negotiable.
Network fees ("gas") go to blockchain validators, not Coinbase. To lower them:
Yes, it's completely safe. The "Connect to Coinbase" feature securely links the two platforms, streamlining transfers without exposing your wallet's private keys or 12-word secret phrase. Your Coinbase Wallet remains a self-custody wallet where you—and only you—hold the keys. The connection is a convenient bridge, but all standard security rules, like double-checking addresses, still apply.
Cross-chain analysis reveals that transfers utilizing layer-2 networks achieve 60-85% lower costs compared to mainnet execution, with mathematical models identifying optimal network selection based on asset type and urgency requirements. Statistical frameworks show intelligent network selection achieves 40-60% better cost efficiency compared to default routing, while Monte Carlo simulations modeling network scenarios generate optimal routing sequences accounting for gas costs, bridge fees, and exchange processing requirements. Network capacity modeling using queuing theory predicts optimal timing based on congestion levels, with cross-network correlation analysis identifying systematic relationships enabling predictive routing optimization through dynamic selection and intelligent coordination across blockchain ecosystems.
Random Forest algorithms processing hundreds of network and exchange variables achieve 85-90% accuracy in predicting optimal transfer routes while identifying cost-efficiency opportunities manual analysis might miss. LSTM neural networks processing sequential transfer data identify temporal patterns in network efficiency and exchange processing cycles, achieving superior routing optimization and timing prediction. Natural Language Processing models analyzing exchange announcements achieve 80-85% accuracy in predicting processing disruptions, while Support Vector Machine models achieve 87-92% accuracy in classifying transfer conditions optimal for specific execution objectives. Ensemble methods combining approaches provide robust optimization maintaining high performance across diverse conditions through consensus-based routing selection.
Dynamic routing algorithms select optimal pathways using mathematical models balancing cost objectives against speed and reliability requirements, achieving optimal execution through intelligent coordination adapting to changing conditions. Real-time monitoring tracks multiple networks and exchanges simultaneously to identify optimal opportunities and automatically execute when conditions meet criteria, with statistical analysis detecting favorable execution conditions while maintaining reliability. Intelligent batch processing coordinates transfers into optimized sequences minimizing costs through strategic timing and network selection, while cross-platform coordination optimizes strategies across exchanges and networks through intelligent routing adapting to changing market and operational requirements.
Network and exchange evolution analysis enables prediction of optimal periods for large operations based on expected capacity and processing development patterns, with cost trend algorithms analyzing historical patterns and upgrade schedules to forecast favorable periods for different asset categories. Exchange capacity forecasting integrates operational development and technology advancement to predict performance evolution over different horizons, while technology integration impact analysis predicts how improvements and upgrades will affect costs and execution strategies. Strategic portfolio management coordinates individual optimization with asset management objectives through comprehensive strategies adapting to changing landscapes while maintaining efficiency, enabling proactive transfer planning that capitalizes on predicted infrastructure development patterns.
Ready to stop guessing and start tracking the wallets that win? Wallet Finder.ai gives you the on-chain intelligence to see what the smart money is doing and act on it. Discover profitable traders, get real-time alerts, and mirror winning strategies before the market moves. Start your 7-day trial and trade smarter at https://www.walletfinder.ai.

A premier DeFi analytics platform empowering traders to discover and analyze profitable blockchain wallets, trades and tokens.

